Getting Lion from the App Store is convenient, but if you want a physical copy of the installation, you can easily make your own Lion install DVD or USB drive with Disk Utility.
If you want to do a clean installation of Lion, you'll need to install it on some sort of physical media. Apple will be releasing a flash drive installer for a whopping $70 in August, but you don't need to wait (or pay twice the OS's price) to get it.
It's very easy to burn Apple's installer to a single layer DVD or flash drive of 5GB or larger.
Note that the Lion installer deletes itself if you upgrade, so if you want to do this, you have to do it before you update your computer to Lion.
Once you've got it on your system, here are the steps to follow:
1. Download Lion from the Mac App Store. The installer should show up in your Applications folder.
2. Right-click on the installer and hit "Show Package Contents". Navigate to Contents > SharedSupport and look for a file called "InstallESD.dmg".
3. Open up Disk Utility and drag the DMG file into the left-hand sidebar. If you're burning it to a DVD, insert your DVD, select the disk image in the sidebar, and hit the "Burn" button.Or if you want to burn Lion to a USB flash drive, plug it in and click on it in the left-hand sidebar in Disk Utility. Go to the Partition tab and select "1 Partition" from the dropdown menu. Choose "Mac OS Extended (Journaled) on the left.
4. Hit the Options button under the partition table and choose "GUID Partition Table". You'll need this to make the drive bootable on a Mac.
5.Hit the Apply button when you're done to format your drive (note: it will erase everything on the drive).
6. Click on the "Restore" tab, choose the InstallESD.dmg file as the source and your flash drive as the destination. Hit the Apply button and it will create your bootable USB drive.
7. Reboot into OS X and hold the option key when you hear the startup chime. You can boot into your DVD or flash drive from there.
Saturday, September 3, 2011

Wednesday, April 20, 2011
Hyperlinks in Outlook 2007 or 2010 not working
This usually happens when there is no default Internet browser (properly) registered in Windows.
Whether you use Internet Explorer, Mozilla Firefox, Google Chrome or Opera, make sure your browser is set as the default browser.
You can reassign a default browser via:
Windows Vista and Windows 7: Start-> Default Programs
Windows XP: Control Panel-> Set Program Access and Defaults
When you have multiple browsers installed, it sometimes helps to set the other browser as the default, apply the changes and then set your preferred browser as the default again.
If you only have a single Internet browser installed in Windows Vista or Windows 7, you can also deselect all the defaults for the browser by pressing “Choose defaults for this program”, save the changes and then select them all again.
Reset the browser
Depending on your Internet browser, you might additionally need to reset the browser. For Internet Explorer this can be done in Control Panel-> Internet Options. When you use Internet Explorer 6 or lower, you’ll find this option on the Programs tab. For Internet Explorer 7 and 8, you can find this option on the Advanced tab.
For Firefox, open a Run command and type the following (note the spaces);
firefox -safe-mode firefox-safe-mode
In the dialog that pops-up select the option “Reset all user preferences to Firefox defaults” and press “Make Changes and Restart”.
Registry fix
If resetting via the conventional means does not work out for you, then the issue is probably rooted a bit deeper and are the file associations and handlers not correctly registered in the registry or are conflicting. To resolve this, you can download this registry file.
This zip-file contains 3 files:
readme.txt Some information over the zip-file itself
ie-fix-restrictions-Win32.reg For when using a 32-bit version of Windows
ie-fix-restrictions-Win64.reg For when using a 64-bit version of Windows
This registry file contains the minimal amount or registry entries needed for making Internet links open again with Internet Explorer. All these registry entries are original entries which are also there when you do a clean installation of Windows.
If found, it also removes some registry entries which could conflict with the original entries. These registry entries also do not exist when doing a clean installation of Windows.
Note 1: For importing this registry file you’ll need to have Administrator rights on the computer.
Note 2: The registry keys are based on a default installation of Windows on the C:\-drive. If you installed Windows to another drive letter or if you want to see what’s inside the reg-file before importing it, you can extract the zip-file and then open/edit it in Notepad by right clicking on the reg-file and choosing Edit.
Whether you use Internet Explorer, Mozilla Firefox, Google Chrome or Opera, make sure your browser is set as the default browser.
You can reassign a default browser via:
Windows Vista and Windows 7: Start-> Default Programs
Windows XP: Control Panel-> Set Program Access and Defaults
When you have multiple browsers installed, it sometimes helps to set the other browser as the default, apply the changes and then set your preferred browser as the default again.
If you only have a single Internet browser installed in Windows Vista or Windows 7, you can also deselect all the defaults for the browser by pressing “Choose defaults for this program”, save the changes and then select them all again.
Reset the browser
Depending on your Internet browser, you might additionally need to reset the browser. For Internet Explorer this can be done in Control Panel-> Internet Options. When you use Internet Explorer 6 or lower, you’ll find this option on the Programs tab. For Internet Explorer 7 and 8, you can find this option on the Advanced tab.
For Firefox, open a Run command and type the following (note the spaces);
firefox -safe-mode firefox-safe-mode
In the dialog that pops-up select the option “Reset all user preferences to Firefox defaults” and press “Make Changes and Restart”.
Registry fix
If resetting via the conventional means does not work out for you, then the issue is probably rooted a bit deeper and are the file associations and handlers not correctly registered in the registry or are conflicting. To resolve this, you can download this registry file.
This zip-file contains 3 files:
readme.txt Some information over the zip-file itself
ie-fix-restrictions-Win32.reg For when using a 32-bit version of Windows
ie-fix-restrictions-Win64.reg For when using a 64-bit version of Windows
This registry file contains the minimal amount or registry entries needed for making Internet links open again with Internet Explorer. All these registry entries are original entries which are also there when you do a clean installation of Windows.
If found, it also removes some registry entries which could conflict with the original entries. These registry entries also do not exist when doing a clean installation of Windows.
Note 1: For importing this registry file you’ll need to have Administrator rights on the computer.
Note 2: The registry keys are based on a default installation of Windows on the C:\-drive. If you installed Windows to another drive letter or if you want to see what’s inside the reg-file before importing it, you can extract the zip-file and then open/edit it in Notepad by right clicking on the reg-file and choosing Edit.
Tuesday, February 22, 2011
How to Uninstall Antivirus .NET?
What this infection does:
Antivirus .NET is a rogue anti-spyware program from the same family as Antivirus Scan . When this infection is installed on your computer it will be configured to start automatically. Once started it will scan your computer and list numerous infections in the scan results. If you attempt to remove any of these so-called infections it will state that you first need to purchase the program in order to remove anything. As these scan results are all fake, please do not purchase this program based upon anything it states.
There are a total of 4 images of Antivirus .Net that you may get on your infected PC:
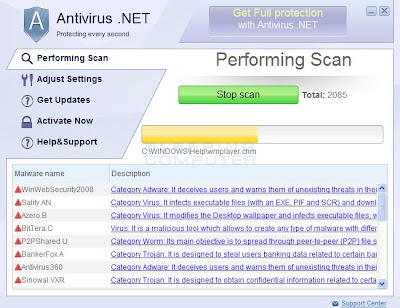
To protect itself, Antivirus .NET will terminate most executables that you attempt to run. It does this to prevent you from running any security applications that may be able to remove the infection. When the rogue terminates the program it will display an alert stating that the program is infected. The text of this alert is:
Security Warning
Application cannot be executed. The file defrag.exe is infected. Do you want to activate your antivirus software now?
This alert should be ignored as the files you are attempting are not actually infected.
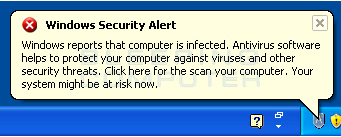
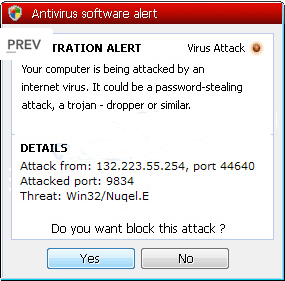
While running, Antivirus .NET will also display fake security alerts on your computer. These security alerts are used to make you think that there are various security problems on your computer. The text of some of these alerts include:
Windows Security Alert
Windows reports that computer is infected. Antivirus software helps to protect your computer against viruses and other security threats. Click here for the scan your computer. Your system might be at risk now.
Antivirus software alert
Infiltration alert
Your computer is being attacked by an Internet virus. It could be password-stealing attack, a trojan-dropper or similar.
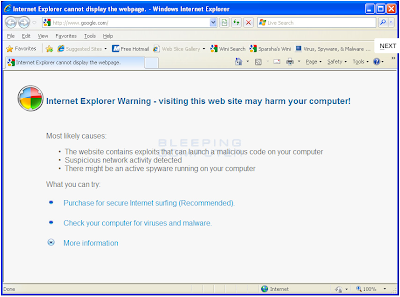
Antivirus .NET will also configure your computer to use a proxy server so that your web browser will display warnings when you browse the web. This warning is:
Internet Explorer Warning - visiting this web site may harm your computer!
Most likely causes:
- The website contains exploits that can launch a malicious code on your computer
- Suspicious network activity detected
- There might be an active spyware running on your computer
Just like the fake scan results, these fake alerts and browser hijack messages are just another tactic to have you purchase the program.
As you can see, the warnings issued by this program are all fake, and once you realize that, the alerts become more of a nuisance rather than a concern. Therefore, do not purchase Antivirus .NET for any reason, and if you already have, please contact your credit card company and state that the program is a computer infection and a scam and that you would like to dispute the charge. To remove this infection and related malware, please follow the steps below.
1. It is possible that the infection you are trying to remove will not allow you to download files on the infected computer. If you run into this problem when following the steps in this guide you will need to download the files requested in this guide on another computer and then transfer them to the infected computer. You can transfer the files via a CD/DVD, external drive, or USB flash drive.
2. Reboot your computer into Safe Mode with Networking using the instructions for your version of Windows.
When the computer reboots into Safe Mode with Networking make sure you login with the username you normally use. When you are at your Windows desktop, please continue with the rest of the steps.
3. This infection changes your Windows settings to use a proxy server that will not allow you to browse any pages on the Internet with Internet Explorer or update security software. Regardless of the web browser you use, for these instructions we will first need need to fix this problem so that we can download the utilities we need to remove this infection.
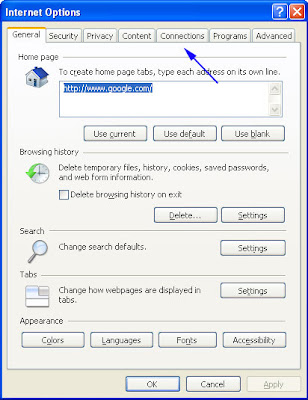
4. Please start Internet Explorer, and when the program is open, click on the Tools menu and then select Internet Options as shown in the image below. Click on the Connections tab as designated by the blue arrow.
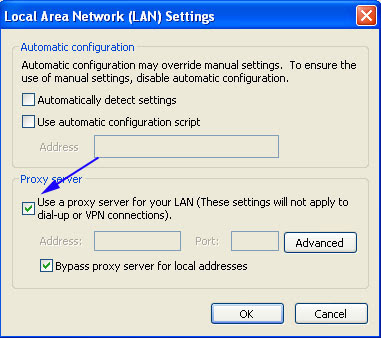
5. Click on the Lan Settings button. You will now be at the Local Area Network (LAN) settings screen as shown by the image below. Under the Proxy Server section, please uncheck the checkbox labeled Use a proxy server for your LAN. Then press the OK button to close this screen. Then press the OK button to close the Internet Options screen. Now that you have disabled the proxy server you will be able to browse the web again with Internet Explorer.
6. Now we must end the processes that belong to Antivirus .NET so that it does not interfere with the cleaning procedure. To do this, please download RKill to your desktop from the following link.
When at the download page, click on the Download Now button labeled iExplore.exe download link. When you are prompted where to save it, please save it on your desktop.
If you are unable to connect to the site to download RKill, please go back and do steps 3-6 again and make sure the infection has not reenabled the proxy settings. You may have to do this quite a few times before you can get RKill downloaded. If you still cannot download the RKill program on the infected computer, you should download it to a clean computer and copy it to the infected one via a USB flash drive or CDROM.
7. Once it is downloaded, double-click on the iExplore.exe icon in order to automatically attempt to stop any processes associated with Antivirus .NET and other Rogue programs. Please be patient while the program looks for various malware programs and ends them. When it has finished, the black window will automatically close and you can continue with the next step. If you get a message that RKill is an infection, do not be concerned. This message is just a fake warning given by Antivirus .NET when it terminates programs that may potentially remove it. If you run into these infections warnings that close RKill, a trick is to leave the warning on the screen and then run RKill again. By not closing the warning, this typically will allow you to bypass the malware trying to protect itself so that RKill can terminate Antivirus .NET . So, please try running RKill until the malware is no longer running. You will then be able to proceed with the remaining steps. Do not reboot your computer after running RKill as the malware programs will start again.
If you continue having problems running RKill, you can download the other renamed versions of RKill from the RKill download page. Both of these files are renamed copies of RKill, which you can try instead. Please note that the download page will open in a new browser window or tab.
8. Next, download Malwarebytes' Anti-Malware, or MBAM and save it to your desktop.
If you are unable to connect to the site to download Malwarebytes', make sure the infection has not reenabled the proxy settings.
Once downloaded, close all programs and Windows on your computer, including this one.
Double-click on the icon on your desktop named mbam-setup.exe. This will start the installation of MBAM onto your computer.
When the installation begins, keep following the prompts in order to continue with the installation process. Do not make any changes to default settings and when the program has finished installing, make sure you leave both the Update Malwarebytes' Anti-Malware and Launch Malwarebytes' Anti-Malware checked. Then click on the Finish button. If MalwareBytes' prompts you to reboot, please do not do so.
MBAM will now automatically start and you will see a message stating that you should update the program before performing a scan. As MBAM will automatically update itself after the install, you can press the OK button to close that box and you will now be at the main program as shown below.
On the Scanner tab, make sure the the Perform full scan option is selected and then click on the Scan button to start scanning your computer for Antivirus .NET related files.
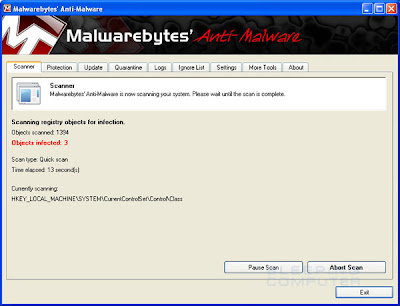
MBAM will now start scanning your computer for malware. When MBAM is scanning it looks like the image below.
When the scan is finished, you should click on the OK button to close the message box and continue with the Antivirus .NET removal process.
You will now be back at the main Scanner screen. At this point you should click on the Show Results button.
A screen displaying all the malware that the program found appears. You should now click on the Remove Selected button to remove all the listed malware. MBAM will now delete all of the files and registry keys and add them to the programs quarantine. When removing the files, MBAM may require a reboot in order to remove some of them. If it displays a message stating that it needs to reboot, please allow it to do so. Once your computer has rebooted, and you are logged in, please continue with the rest of the steps.
When MBAM has finished removing the malware, it will open the scan log and display it in Notepad. Review the log as desired, and then close the Notepad window.
You can now exit the MBAM program.
Antivirus .NET is a rogue anti-spyware program from the same family as Antivirus Scan . When this infection is installed on your computer it will be configured to start automatically. Once started it will scan your computer and list numerous infections in the scan results. If you attempt to remove any of these so-called infections it will state that you first need to purchase the program in order to remove anything. As these scan results are all fake, please do not purchase this program based upon anything it states.
There are a total of 4 images of Antivirus .Net that you may get on your infected PC:


To protect itself, Antivirus .NET will terminate most executables that you attempt to run. It does this to prevent you from running any security applications that may be able to remove the infection. When the rogue terminates the program it will display an alert stating that the program is infected. The text of this alert is:
Security Warning
Application cannot be executed. The file defrag.exe is infected. Do you want to activate your antivirus software now?
This alert should be ignored as the files you are attempting are not actually infected.
While running, Antivirus .NET will also display fake security alerts on your computer. These security alerts are used to make you think that there are various security problems on your computer. The text of some of these alerts include:
Windows Security Alert
Windows reports that computer is infected. Antivirus software helps to protect your computer against viruses and other security threats. Click here for the scan your computer. Your system might be at risk now.
Antivirus software alert
Infiltration alert
Your computer is being attacked by an Internet virus. It could be password-stealing attack, a trojan-dropper or similar.
Antivirus .NET will also configure your computer to use a proxy server so that your web browser will display warnings when you browse the web. This warning is:
Internet Explorer Warning - visiting this web site may harm your computer!
Most likely causes:
- The website contains exploits that can launch a malicious code on your computer
- Suspicious network activity detected
- There might be an active spyware running on your computer
Just like the fake scan results, these fake alerts and browser hijack messages are just another tactic to have you purchase the program.
As you can see, the warnings issued by this program are all fake, and once you realize that, the alerts become more of a nuisance rather than a concern. Therefore, do not purchase Antivirus .NET for any reason, and if you already have, please contact your credit card company and state that the program is a computer infection and a scam and that you would like to dispute the charge. To remove this infection and related malware, please follow the steps below.
1. It is possible that the infection you are trying to remove will not allow you to download files on the infected computer. If you run into this problem when following the steps in this guide you will need to download the files requested in this guide on another computer and then transfer them to the infected computer. You can transfer the files via a CD/DVD, external drive, or USB flash drive.
2. Reboot your computer into Safe Mode with Networking using the instructions for your version of Windows.
When the computer reboots into Safe Mode with Networking make sure you login with the username you normally use. When you are at your Windows desktop, please continue with the rest of the steps.
3. This infection changes your Windows settings to use a proxy server that will not allow you to browse any pages on the Internet with Internet Explorer or update security software. Regardless of the web browser you use, for these instructions we will first need need to fix this problem so that we can download the utilities we need to remove this infection.
4. Please start Internet Explorer, and when the program is open, click on the Tools menu and then select Internet Options as shown in the image below. Click on the Connections tab as designated by the blue arrow.

5. Click on the Lan Settings button. You will now be at the Local Area Network (LAN) settings screen as shown by the image below. Under the Proxy Server section, please uncheck the checkbox labeled Use a proxy server for your LAN. Then press the OK button to close this screen. Then press the OK button to close the Internet Options screen. Now that you have disabled the proxy server you will be able to browse the web again with Internet Explorer.

6. Now we must end the processes that belong to Antivirus .NET so that it does not interfere with the cleaning procedure. To do this, please download RKill to your desktop from the following link.
When at the download page, click on the Download Now button labeled iExplore.exe download link. When you are prompted where to save it, please save it on your desktop.
If you are unable to connect to the site to download RKill, please go back and do steps 3-6 again and make sure the infection has not reenabled the proxy settings. You may have to do this quite a few times before you can get RKill downloaded. If you still cannot download the RKill program on the infected computer, you should download it to a clean computer and copy it to the infected one via a USB flash drive or CDROM.
7. Once it is downloaded, double-click on the iExplore.exe icon in order to automatically attempt to stop any processes associated with Antivirus .NET and other Rogue programs. Please be patient while the program looks for various malware programs and ends them. When it has finished, the black window will automatically close and you can continue with the next step. If you get a message that RKill is an infection, do not be concerned. This message is just a fake warning given by Antivirus .NET when it terminates programs that may potentially remove it. If you run into these infections warnings that close RKill, a trick is to leave the warning on the screen and then run RKill again. By not closing the warning, this typically will allow you to bypass the malware trying to protect itself so that RKill can terminate Antivirus .NET . So, please try running RKill until the malware is no longer running. You will then be able to proceed with the remaining steps. Do not reboot your computer after running RKill as the malware programs will start again.
If you continue having problems running RKill, you can download the other renamed versions of RKill from the RKill download page. Both of these files are renamed copies of RKill, which you can try instead. Please note that the download page will open in a new browser window or tab.
8. Next, download Malwarebytes' Anti-Malware, or MBAM and save it to your desktop.
If you are unable to connect to the site to download Malwarebytes', make sure the infection has not reenabled the proxy settings.
Once downloaded, close all programs and Windows on your computer, including this one.
Double-click on the icon on your desktop named mbam-setup.exe. This will start the installation of MBAM onto your computer.
When the installation begins, keep following the prompts in order to continue with the installation process. Do not make any changes to default settings and when the program has finished installing, make sure you leave both the Update Malwarebytes' Anti-Malware and Launch Malwarebytes' Anti-Malware checked. Then click on the Finish button. If MalwareBytes' prompts you to reboot, please do not do so.
MBAM will now automatically start and you will see a message stating that you should update the program before performing a scan. As MBAM will automatically update itself after the install, you can press the OK button to close that box and you will now be at the main program as shown below.
On the Scanner tab, make sure the the Perform full scan option is selected and then click on the Scan button to start scanning your computer for Antivirus .NET related files.
MBAM will now start scanning your computer for malware. When MBAM is scanning it looks like the image below.

When the scan is finished, you should click on the OK button to close the message box and continue with the Antivirus .NET removal process.
You will now be back at the main Scanner screen. At this point you should click on the Show Results button.
A screen displaying all the malware that the program found appears. You should now click on the Remove Selected button to remove all the listed malware. MBAM will now delete all of the files and registry keys and add them to the programs quarantine. When removing the files, MBAM may require a reboot in order to remove some of them. If it displays a message stating that it needs to reboot, please allow it to do so. Once your computer has rebooted, and you are logged in, please continue with the rest of the steps.
When MBAM has finished removing the malware, it will open the scan log and display it in Notepad. Review the log as desired, and then close the Notepad window.
You can now exit the MBAM program.
Subscribe to:
Posts (Atom)