Antivirus .NET is a rogue anti-spyware program from the same family as Antivirus Scan . When this infection is installed on your computer it will be configured to start automatically. Once started it will scan your computer and list numerous infections in the scan results. If you attempt to remove any of these so-called infections it will state that you first need to purchase the program in order to remove anything. As these scan results are all fake, please do not purchase this program based upon anything it states.
There are a total of 4 images of Antivirus .Net that you may get on your infected PC:
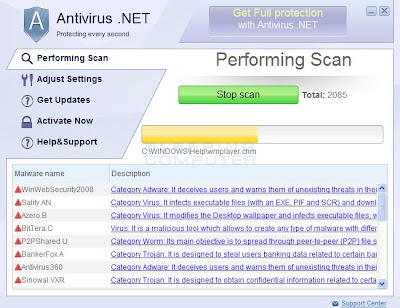
To protect itself, Antivirus .NET will terminate most executables that you attempt to run. It does this to prevent you from running any security applications that may be able to remove the infection. When the rogue terminates the program it will display an alert stating that the program is infected. The text of this alert is:
Security Warning
Application cannot be executed. The file defrag.exe is infected. Do you want to activate your antivirus software now?
This alert should be ignored as the files you are attempting are not actually infected.
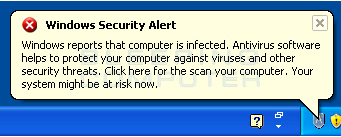
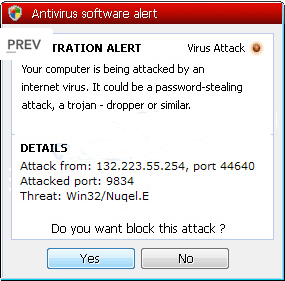
While running, Antivirus .NET will also display fake security alerts on your computer. These security alerts are used to make you think that there are various security problems on your computer. The text of some of these alerts include:
Windows Security Alert
Windows reports that computer is infected. Antivirus software helps to protect your computer against viruses and other security threats. Click here for the scan your computer. Your system might be at risk now.
Antivirus software alert
Infiltration alert
Your computer is being attacked by an Internet virus. It could be password-stealing attack, a trojan-dropper or similar.
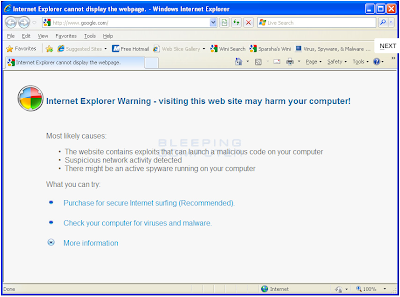
Antivirus .NET will also configure your computer to use a proxy server so that your web browser will display warnings when you browse the web. This warning is:
Internet Explorer Warning - visiting this web site may harm your computer!
Most likely causes:
- The website contains exploits that can launch a malicious code on your computer
- Suspicious network activity detected
- There might be an active spyware running on your computer
Just like the fake scan results, these fake alerts and browser hijack messages are just another tactic to have you purchase the program.
As you can see, the warnings issued by this program are all fake, and once you realize that, the alerts become more of a nuisance rather than a concern. Therefore, do not purchase Antivirus .NET for any reason, and if you already have, please contact your credit card company and state that the program is a computer infection and a scam and that you would like to dispute the charge. To remove this infection and related malware, please follow the steps below.
1. It is possible that the infection you are trying to remove will not allow you to download files on the infected computer. If you run into this problem when following the steps in this guide you will need to download the files requested in this guide on another computer and then transfer them to the infected computer. You can transfer the files via a CD/DVD, external drive, or USB flash drive.
2. Reboot your computer into Safe Mode with Networking using the instructions for your version of Windows.
When the computer reboots into Safe Mode with Networking make sure you login with the username you normally use. When you are at your Windows desktop, please continue with the rest of the steps.
3. This infection changes your Windows settings to use a proxy server that will not allow you to browse any pages on the Internet with Internet Explorer or update security software. Regardless of the web browser you use, for these instructions we will first need need to fix this problem so that we can download the utilities we need to remove this infection.
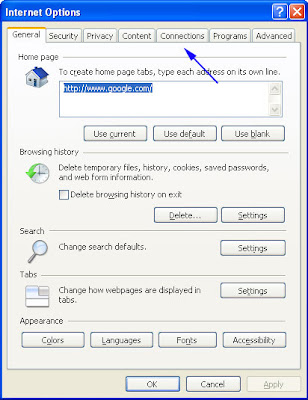
4. Please start Internet Explorer, and when the program is open, click on the Tools menu and then select Internet Options as shown in the image below. Click on the Connections tab as designated by the blue arrow.
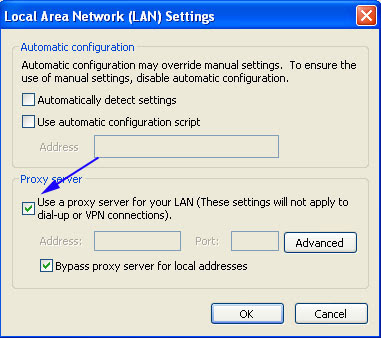
5. Click on the Lan Settings button. You will now be at the Local Area Network (LAN) settings screen as shown by the image below. Under the Proxy Server section, please uncheck the checkbox labeled Use a proxy server for your LAN. Then press the OK button to close this screen. Then press the OK button to close the Internet Options screen. Now that you have disabled the proxy server you will be able to browse the web again with Internet Explorer.
6. Now we must end the processes that belong to Antivirus .NET so that it does not interfere with the cleaning procedure. To do this, please download RKill to your desktop from the following link.
When at the download page, click on the Download Now button labeled iExplore.exe download link. When you are prompted where to save it, please save it on your desktop.
If you are unable to connect to the site to download RKill, please go back and do steps 3-6 again and make sure the infection has not reenabled the proxy settings. You may have to do this quite a few times before you can get RKill downloaded. If you still cannot download the RKill program on the infected computer, you should download it to a clean computer and copy it to the infected one via a USB flash drive or CDROM.
7. Once it is downloaded, double-click on the iExplore.exe icon in order to automatically attempt to stop any processes associated with Antivirus .NET and other Rogue programs. Please be patient while the program looks for various malware programs and ends them. When it has finished, the black window will automatically close and you can continue with the next step. If you get a message that RKill is an infection, do not be concerned. This message is just a fake warning given by Antivirus .NET when it terminates programs that may potentially remove it. If you run into these infections warnings that close RKill, a trick is to leave the warning on the screen and then run RKill again. By not closing the warning, this typically will allow you to bypass the malware trying to protect itself so that RKill can terminate Antivirus .NET . So, please try running RKill until the malware is no longer running. You will then be able to proceed with the remaining steps. Do not reboot your computer after running RKill as the malware programs will start again.
If you continue having problems running RKill, you can download the other renamed versions of RKill from the RKill download page. Both of these files are renamed copies of RKill, which you can try instead. Please note that the download page will open in a new browser window or tab.
8. Next, download Malwarebytes' Anti-Malware, or MBAM and save it to your desktop.
If you are unable to connect to the site to download Malwarebytes', make sure the infection has not reenabled the proxy settings.
Once downloaded, close all programs and Windows on your computer, including this one.
Double-click on the icon on your desktop named mbam-setup.exe. This will start the installation of MBAM onto your computer.
When the installation begins, keep following the prompts in order to continue with the installation process. Do not make any changes to default settings and when the program has finished installing, make sure you leave both the Update Malwarebytes' Anti-Malware and Launch Malwarebytes' Anti-Malware checked. Then click on the Finish button. If MalwareBytes' prompts you to reboot, please do not do so.
MBAM will now automatically start and you will see a message stating that you should update the program before performing a scan. As MBAM will automatically update itself after the install, you can press the OK button to close that box and you will now be at the main program as shown below.
On the Scanner tab, make sure the the Perform full scan option is selected and then click on the Scan button to start scanning your computer for Antivirus .NET related files.
MBAM will now start scanning your computer for malware. When MBAM is scanning it looks like the image below.
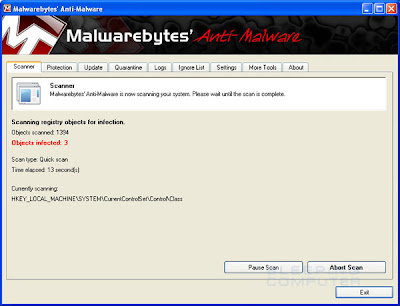
When the scan is finished, you should click on the OK button to close the message box and continue with the Antivirus .NET removal process.
You will now be back at the main Scanner screen. At this point you should click on the Show Results button.
A screen displaying all the malware that the program found appears. You should now click on the Remove Selected button to remove all the listed malware. MBAM will now delete all of the files and registry keys and add them to the programs quarantine. When removing the files, MBAM may require a reboot in order to remove some of them. If it displays a message stating that it needs to reboot, please allow it to do so. Once your computer has rebooted, and you are logged in, please continue with the rest of the steps.
When MBAM has finished removing the malware, it will open the scan log and display it in Notepad. Review the log as desired, and then close the Notepad window.
You can now exit the MBAM program.
