These instructions apply to the following Vonage phone adapters:
Vonage V-Portal
Motorola VT2542
Motorola VT2442
Motorola VT2142
D-Link VWR
Linksys RTP300
Linksys WRTP54G
To install two or more lines of Vonage service, perform the following steps:
1. Install the first Vonage phone adapter by following the instructions provided in the quick start guide. Be sure you have a dial tone before continuing. If one of your phone adapters is a Vonage V-Portal, we recommend the V-Portal be the first phone adapter installed in the sequence (i.e., directly behind your modem). If your Vonage phone adapter is already installed, continue with Step 2.
2. Connect an Ethernet cable from any yellow Ethernet (LAN) port on the previously installed Vonage phone adapter to the blue Internet (WAN) port of the next Vonage adapter in sequence.
3. Connect the power supply provided with the Vonage phone adapter to the power port located on the back of the adapter. Plug the other end into a power outlet.
NOTE: DSL users do not need to configure PPPoE settings for additional phone adapters in sequence.
4. Wait for the Vonage phone adapter to go through its start up sequence. You may notice that the phone adapter will reboot itself one time. This is normal. There may be updates that need to be downloaded. Do not interrupt the process by unplugging the power or lifting the receiver on your phone during the startup process.
5. Once the Vonage phone adapter has completed its power up sequence (for the V-Portal, this means the Phone Line 1 icon is displayed, or if you have another phone adapter, this means its power light is solid and no longer blinking), continue with Step 6.
6. Connect a telephone to the green Phone 1 port on the Vonage phone adapter. Check for a dial tone. If you hear a dial tone, continue with Step 7. If you do not hear a dial tone, go to the troubleshooting section below.
7. Connect an Ethernet cable from any of the yellow Ethernet (LAN) ports of the phone adapter you just installed to a computer. Open a Web browser and enter www.vonage.com or any Web address. If you can access the Internet, you have finished the installation of this phone adapter. If you cannot access the Internet, go to the troubleshooting section below.
8. Repeat Step 2 through Step 7 for each additional Vonage phone adapter you are connecting. Make sure to connect the first adapter to the second, the second to the third, and so forth. If your phone adapter has multiple yellow Ethernet (LAN) ports, you can connect a Vonage phone adapter to each of these ports.
NOTE: The number of phone adapters you will be able to install in sequence while maintaining optimal voice quality is determined by the available upstream bandwidth of your high speed Internet connection. In general, we recommend allowing an estimated 90 Kbps per active call. The total estimated bandwidth for all active calls must be less than your available upstream bandwidth.
Troubleshooting an installation of two or more lines of Vonage service
If one or more of your Vonage lines does not have dial tone, or you are having trouble accessing the Internet, you need to change two settings on your phone adapter. Refer to the user guide for your adapter for details on performing any of these steps.
1. Remove the Ethernet cable from the blue Internet (WAN) port of the Vonage phone adapter currently being installed.
2. Log in to the Web user interface of the Vonage phone adapter you just connected.
3. Locate the setup page for the local area network.
4. Change the local IP address of the Vonage phone adapter from the default value of 192.168.15.1 by incrementing the third octet in the IP address. Each adapter installed must have a unique local IP address. For example, for the second phone adapter installed in sequence, change the Local IP Address to 192.168.16 .1, for the third 192.168. 17.1, and so forth.
NOTE: If you change the Local IP Address on your Vonage phone adapter, you need to use the new local IP address you assigned to log in to the Web user interface.
5. Configure your phone adapter to use your ISP's DNS servers. This option most often appears as a check box labeled Assign ISP DNS, SNTP or a radio button labeled DNS Proxy . If the option appears as a check box labeled Assign ISP DNS, SNTP on your phone adapter, be sure it is selected. If the option appears as a radio button labeled DNS Proxy on your phone adapter, be sure the radio button Disable is selected. This step is not applicable if you are installing a V-Portal.
6. Save the settings.
7. Power cycle your phone adapter. To do so, remove the power supply connected to the power port located on the back of the adapter, wait 5 seconds, and plug it in again.
8. Reconnect the Ethernet cable to the blue Internet (WAN) port.
9. Once the Vonage phone adapter has completed its power up sequence (for the V-Portal this means the Phone Line 1 icon is displayed, or if you have another phone adapter, this means its power light is solid and no longer blinking), or if you have another phone adapter, its power light is solid and no longer blinking, check to see if you can get online and have a dial tone. If so, continue installing the remaining phone adapters following the steps outlined above. If not, contact Vonage Customer Care for assistance.
Wednesday, October 13, 2010
Tuesday, September 21, 2010
How To Install a Language Pack In Windows 7 Professional Edition?
Windows 7 Home Premium and Windows 7 Professional also don’t allow you to install language packs by default.
Windows 7 Home Premium and Professional Edition users can follow the steps given below to install a language pack:
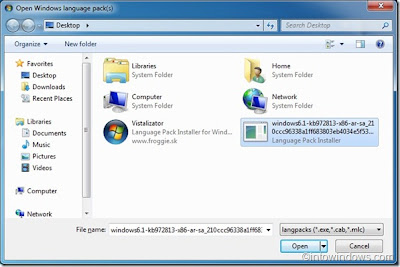
1. Download Vistalizator. Vistalizator is a portable tool for Vista and Windows 7 to install language packs.
2. Also download your language pack from here.
3. Fire up the Vistalizator program.

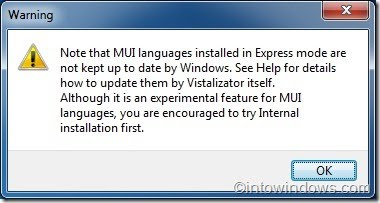
4. Click Add languages button and browse to the language pack that you have downloaded in the first step and click Open to start installing the language pack. If you see any warnings, simply click Ok.
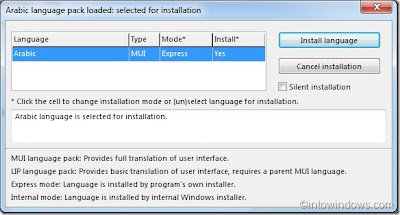
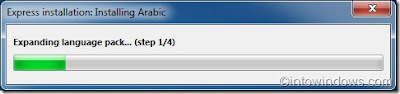
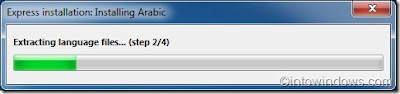
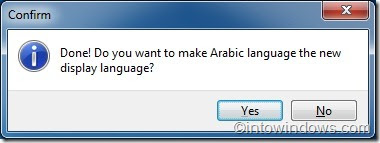
5. Vistalizator will take a few minutes to complete the language pack installation. Once the language pack is installed, you will be given option to set the new language as the active one.
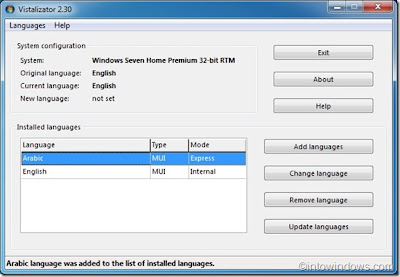
6. To switch between current and default languages, run Vistalizator, select the language and click Change language button.
Windows 7 Home Premium and Professional Edition users can follow the steps given below to install a language pack:
1. Download Vistalizator. Vistalizator is a portable tool for Vista and Windows 7 to install language packs.
2. Also download your language pack from here.
3. Fire up the Vistalizator program.

4. Click Add languages button and browse to the language pack that you have downloaded in the first step and click Open to start installing the language pack. If you see any warnings, simply click Ok.


5. Vistalizator will take a few minutes to complete the language pack installation. Once the language pack is installed, you will be given option to set the new language as the active one.

6. To switch between current and default languages, run Vistalizator, select the language and click Change language button.

How do you get Trojan Horse PSW Agent H off your PC?
There are several ways to rid your computer of PSW Agent H manually.
A. Manual Removal: follow these steps.
Go into safe mode (probably F8 when you reboot).
Search drive C for SYSUPD.EXE and delete it. Apparently this program won't start in safe mode.
Then remove from Recycle Bin.
Restart in normal mode and run a full scan with AVG. It can now heal the infected file and you no longer have a virus on your PC.
Use Malwarebytes
You can get rid of the trojan horse by following these steps:
1. Download and install the Malwarebytes on your computer.
2. Update your Malwarebytes.
3. Scan your computer for all the malwares.
4. Remove all the malwares, found while scanning with Malwarebytes.
5. Restart your computer.
Other anti-malware programs you can install and use:
1. Install and run Malwarebytes Anti-Malware.
2. Run a complete scan with the utility Dr.Web CureIt!
3. Run the anti-spyware removal programs Spybot or Superantispyware.
4. Install ThreatFire: ThreatFire features innovative real-time behavioral protection technology that provides powerful standalone protection or the perfect complement to traditional signature-based antivirus programs, and offers unsurpassed protection against both known and unknown zero-day viruses, worms, trojans, rootkits, buffer overflows, spyware, adware and other malware.
I also recommend you use Mozilla Firefox or Google Chrome browsers for browsing unsafe websites.
Another option is to run an online virus scan like:
Trend Micro HouseCall
Kaspersky free online virus scanner
Windows Live OneCare safety scanner
BitDefender Online Scanner
ESET Online Antivirus Scanner
F-Secure Online Virus Scanner
Avast! Online Scanner
Update your software by running Secunia Online Software Inspector.
An absolute must is:
Install a good antivirus in your computer.
Keep your antivirus updated. If automatic updates are available, configure your antivirus to use them.
Keep your permanent antivirus protection enabled at all times.
B. If all the above options failed, here are a few steps to follow for manual removal:
The way to remove PSW.Agent.H is simple, but the only catch is there is a process running called SYSUPD.EXE which protects the Trojan source file, _UPDATE.DAT, in Documents and Settings from being removed. So, here is what you do:
Read all the steps below before you start.
1. Run a search on the computer for a file called SYSUPD.EXE.
2. Open My Computer, and browse to the folder that contains the file.
3. Press Ctrl+Alt+Del, and click on Task Manager.
4. Look on the bottom of the Task Manager window to see how many process are running (example: Process:15).
5. Find SYSUPD.EXE and stop it. Most likely it will keep starting it self over.
4. Keep looking for it and stopping it, until the number of processes go down by one.
Once you reach this point, you only have a few seconds until it restarts, so be quick.
5. Switch to the window where SYSUPD.EXE is located and quickly remove it. Once it has been removed, you can remove the main file _UPDATE.DAT. which will be found somewhere in Documents and Settings. If you cannot find it, run a search for it.
7. Run AVG again to make sure the Trojan is gone.
If you can't find _UPDATE.DAT with a search, don't be concerned. Just run your AVG and it can heal it once the SYSUPD.EXE file is gone.
Make sure you have AVG installed first. Its the only antivirus that finds it and the only one that can eventually heal it.
C. Another Manual Removal Method
All Trojan horses are hidden files, so you would need to go to the Files Option. In Windows XP, go to the Control Panel and click on Tools, then Folder Options, then View. Uncheck both the *Hide file extension for known file types" and *Hide protected operating system files" Recommended boxes, then OK yourself out.
You will then need to restart your computer and and go into Safe Mode by holding the F8 key down at the beginning of start up. When you're at the DeskTop screen, go to Start/ Search/ For Files and Folders and type up the NAME OF THE FILE & EXT which would have shown up on your Anti-Virus software. In the case of PSW Agent H the file is SYSUPD.EXE.
Restart your computer and run a full scan with AVG. AVG can now heal the infected file.
Tuesday, July 13, 2010
How to fix “Windows was unable to find a certificate to log you on to the network”
Here’s how to connect to your wireless router if you are getting this message: “Windows was unable to find a certificate to log you on to the network.”
1) Click on the wireless icon in your taskbar and under Related Tasks, choose Change advanced settings.
2) Now click on the Wireless Networks tab and select the network in the list at the bottom. Click on Properties once you select the wireless network that is having problems.
3) Click on the Authentication tab and now uncheck the Enable IEEE 802.1x authentication for this network box. If the box was checked, then that was why you were getting the “unable to find a certificate to log you on to the network” message because Windows is looking for one, but your wireless router is not setup for certificate security.
Once this box is unchecked, try to reconnect to the wireless network, and it should work fine!
Monday, July 5, 2010
How to add a Hotmail account to Outlook 2010?
It’s not neccessary to install the Outlook Connector in order to add a
hotmail account to Outlook 2010. You can just do it by setting up a
POP3 account. Only difference is that it doesn’t receive your created
folders, only the inbox.
Use the following settings:
- Username: your complete emailadres : example@hotmail.com
- Password: as usual
- Incoming mail server: pop3.live.com
- Outgoing server: smtp.live.com
- Check the box in front of “Require logon using Secure Password Authentication (SPA)"
Then go to “more settings” and the “Advanced” Tab.
- For the Incoming Server use port 995
- Check the box in front of the SSL sentence
- For the Outgoing Server, use port 587 and with “Use the following type of encrypted connection” select “TLS” out of the dropdown menu.
To allow users to use Outlook 2010 to access and manage their Microsoft Windows Live Hotmail or Microsoft Office Live Mail accounts including e-mail messages, contacts and calendars, Microsoft has quietly released an updated version of Outlook Connector for Office 2010 under the Microsoft Office 2010 Technical Preview suite. Users who use Office 2010 can download the free application via the following links:
Outlook Connector for Office 2010 (x86)
Outlook Connector for Office 2010 (x64)
Monday, June 7, 2010
How do I get multiple homepages in Safari?
Here are a few steps to follow:
1) Create a new Bookmark Folder in your Bookmarks in Safari called "Open," or any other name.
2) Place your urls in that folder.
3) Go to preferences and select "New windows open with:"
4) Select "Choose tabs folder."
5) Select your "Open" folder.
6) Exit Safari.
When you open it again your Home page tabs should be there!
Sunday, May 23, 2010
How to export email from Outlook for Windows into Apple Mail or Entourage for Macintosh?
Outlook is the most popular email client for Windows. MessageSave makes it very easy to export your Outlook email and import it into a Mac mail client, such as Apple Mail, Entourage, etc. MessageSave will work with any Outlook email account (PST or Exchange). MessageSave preserves attachments, sender email addresses, message timestamps, multiple languages. Download the trial version and see for yourself how easy it is. MessageSave supports exporting contacts and Calendar in addition to migrating messages.
Follow this very simple process:
1. Download and install MessageSave on your Windows PC and restart Outlook.
2. Run "Tools -> MessageSave -> Apple Mac Export -> Export Messages" menu command to export your Outlook folders as MBOX files.
3. Copy the MBOX files over to the Mac.
4. Import the MBOX files into your Mac mail client (Apple Mail or Entourage).
To import an MBOX file into Apple Mail:
1. Copy the .mbox file to your Mac. A USB flash drive or an external hard drive is probably the easiest way to do that.
2. Open Apple Mail.
3. Invoke "File->Import Mailboxes" menu command.
4. Check the "mbox files" option and click "Continue".
5. Select your MBOX files in the next window and click "Continue".
To import an MBOX file into Entourage:
1. Copy the .mbox file to your Mac. A USB flash drive or an external hard drive is probably the easiest way to do that.
2. Open Entourage.
3. Simply drag and drop it onto the Entourage Inbox (in the Entourage folder list).
4. After that, you should see a small triangle to the left of the Inbox. Click on it to display the newly imported folder(s). Note: If you have a large number of messages, Entourage might take a bit of time processing your MBOX file.
Important Notes:
- MBOX format is supported only when using MessageSave with Outlook 2002 or newer.
- To import an mbox file into Entourage, simply drag and drop it onto one of the folders in the Entourage folder list. Be sure to drop it into a local (On My Computer) folder, as opposed to a folder on a server. (You will be able to move it later).
- Apple Mail and Entourage might have trouble importing very large mbox files (over 3000 messages). If you hit this issue, try splitting your large Outlook folder into smaller folders with fewer than 3000 messages each. This is a Mail and Entourage issue, not MessageSave.
- Apple Mail (and Thunderbird) have issues importing mbox files with very long names, or with certain characters, such as #, in the file name. If you see errors, try renaming your mbox file.
- We have tested MessageSave on folders with tens of thousands of messages - it worked without a hitch. However, exporting large folders might take a bit of time. Also, the evaluation version is limited to processing 50 messages at a time. Be assured that the full version does not have this limit.
- When you try to import the mbox file(s) into Apple Mail, the import dialog may display the mbox files as grayed out. Simply click "Choose" and Apple Mail will import the files.
Wednesday, May 5, 2010
"Error 1311: cannot locate source file" error message when you install a 2007 or 2003 Office suite
Symptoms
When you install a 2007 Microsoft Office or Microsoft Office 2003 suite, you may receive an error message that is similar to one of the following:
Error 1311
Cannot locate source file Cabinetfile.cab
Error 1311
Source file not found Cabinetfile.cab (ie. sku112.cab)
Cause
This problem may occur when the following conditions are true:
• You are installing Microsoft Office 2003 from an installation point that is located on the network and that is accessed by multiple users.
• The installation source at this network location is contained in cabinet files.
• Microsoft Office 2003 is being installed on another computer on the network at the same time that you are trying to install Microsoft Office 2003 and the computer is using the same network installation point.
• The operating system of the other computer is the original released version of Microsoft Windows XP Note Microsoft Windows XP Service Pack 1 (SP-1) is not installed.
• If this problem occurs when you upgrade to a 2007 Office suite, the local installation source for the earlier version of Office could have been moved or deleted. Alternatively, the local installation source could be corrupted.
The other network computer does not release control of the installation files in a timely manner as expected. This prevents your computer from accessing those files.
Workaround
To work around this behavior, use any of the following methods:
• Create an administrative installation point for Office 2003. Cabinet files are not present in administrative installation points.
• When you receive the error message, click Retry to make the installation continue correctly.
• Upgrade the operating systems of any Windows XP client computers on the network to Windows XP Service Pack 1 (SP1). To do this, a user with the correct permissions must log on to each Windows XP client computer, click Start, point to All Programs, and then click Windows Update.
• If this problem occurs when you upgrade to a 2007 Office suite, locate the insert the installation CD for the earlier version of Office into the CD drive, and then click Retry. If this does not resolve the problem, follow these steps:
1. Cancel the 2007 Office upgrade.
2. Remove the earlier version of Office by using the Add or Remove Programs item in Control Panel.
3. Reinstall the 2007 Office suite.
How to reset the nickname and the automatic completion caches in Outlook
Have you ever wondered where Outlook stores data it uses to auto-complete email addresses when you are typing in the To or Cc field? Microsoft stores this data in a file with the extension .NK2. The cache file is stored in each user’s profile in drive:\Documents and Settings\user name\Application Data\Microsoft\Outlook. Note that this may be a hidden folder, so you may need to change your view settings to see the file. The file should be named outlook profile name.nk2.
Every time you enter a new email address when composing an email that address will be added to the nk2 file so that the next time you type the name, the auto-complete feature will try to guess what you are typing and fill in the details for you.
If this nickname cache file is corrupted, Outlook may not be able to identify recipients, may offer incorrect recipients when automatically completing the email address, or may send the message to the wrong person.
Outlook 2010
Use one of the methods listed below to reset the Outlook nickname cache for Microsoft Outlook 2010.
Method 1
1. With Outlook 2010 open, click File (BackStage), and then click Options.
2. Click the Mail tab.
3. Under Send Messages, click Empty Auto-Complete List.
Outlook will generate a new nickname cache.
Method 2
1. Click Start, and then click Run.
2. Start Outlook by using the /CleanAutoCompleteCache switch.
For example: Outlook.exe /CleanAutoCompleteCache
Note If Outlook is not installed in the default location, you will need to point to the path of Outlook.exe.
Outlook will generate a new nickname cache.
Outlook 2002 through Outlook 2007
Use the steps in the following section to reset the Outlook nickname cache for Microsoft Windows XP.
1. Quit Outlook.
2. Click Start, and then click Search.
3. In the Search Companion left-side panel, click All files or folders.
4. In the All or part of the file name: box, type *.NK2.
5. In the Look In box, click to select your local hard disk.
6. Click More advanced options, click to select Search hidden files and folders check box.
7. Click Search.
8. Right-click the .NK2 file with the name of the profile that you want to reset, and then click Rename.
9. Rename the file to profilename.bak, and then press ENTER.
10. Quit Windows Explorer.
11. Restart Outlook.
Outlook will generate a new nickname cache.
Additional function you may want to perform:
Move the cache file from computer to computer.
The file is profile specific, so you need to be sure that the profile exists on both machines. Once that is done, it’s simply a matter of copying the file from one machine to the other.
The location of the file is in:
drive:\Documents and Settings\user name\Application Data\Microsoft\Outlook\outlook profile name.nk2
If you have a new outlook profile that is the destination for the file, just rename the file to the new profile name. This means that you can copy the same file to multiple users, just rename the file for each profile.
Setting Exclusion Ranges in Windows Server 2003
This applies to Windows Server 2003, Windows Server 2003 R2, Windows Server 2003 with SP1, Windows Server 2003 with SP2
To prevent address conflicts, the scopes that you define must exclude the IP addresses of devices that you statically configure, such as DHCP servers. By setting exclusion ranges, an administrator can exclude IP address ranges within a scope so that those addresses are not offered to DHCP clients. When you create a new scope, immediately exclude addresses of the existing statically configured computers. Excluded IP addresses can be active on your network, but only when these addresses are manually configured or distributed as reserved IP addresses. For more information about reservations, see "Creating Reservations" later in this chapter.
You can set exclusion ranges in the Add Exclusions page of the New Scope Wizard.
To set an exclusion range after a scope is created
1. In the DHCP snap-in, expand the scope you want to configure.
2. Select and right-click Address Pool under the appropriate scope.
3. Select New Exclusion Range.
4. In the Add Exclusion dialog box, type the starting and ending IP addresses of the exclusion range, and then click Add.
How do you resolve the message "The system has recovered from a serious error" in Windows XP?
Symptoms
Sometimes when there is some problem with your computer, Windows either forces you to restart or automatically reboots. Upon restart it displays the message “The system has recovered from a serious error“.

After clicking to see what data the error report contains, a screen similar to the following appears:
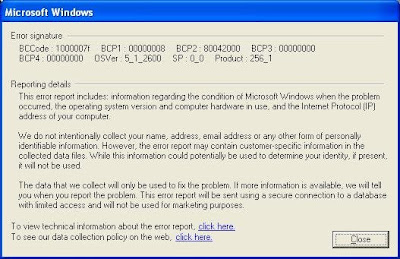
If Windows XP restarts because of a serious error, the Windows Error Reporting tool prompts you to report the problem to Microsoft for troubleshooting purposes. Windows may prompt you to report this information every time that you restart the computer, even if no error occurred during the previous session. After this problem begins to occur, you are prompted to send the information after every restart, even if you do not send the information.
Cause
This problem occurs because after a Minidump file is written, the paging file continues to have a flag set that indicates that a Minidump file must be written.
Resolution
Use Windows Update to download the System Recovered Error Message Update.
1. Connect to the Internet.
2. Open Windows Update.
From the Windows XP default Start menu, point to All Programs, and then click Windows Update.
From the classic Start menu, point to Programs, and then click Windows Update.
3. Note: If Windows Update is not found on the Start menu, click Run. In the Run dialog box, type: Wupdmgr.exe. Click OK. Note: The first time the Windows Update Web site is used, you may be prompted to install required software or controls. Click Yes for each of these.
4. After the Web browser page has completely loaded, click Scan for updates.
5. After the Web browser page has completely loaded, click Review and install updates.
6. There may be several items to install. You can install all of them, which may take quite some time to download, or you can remove the unwanted items by clicking Remove. To resolve this specific issue, the System Recovered Error Message Update must be installed. The file is 2.8 megabytes (MB) in size.
7. After the desired items are listed on the Total Selected Updates page, click Install Now.
8. In the Microsoft Windows Update dialog box, click Accept.
9. In the Microsoft Internet Explorer dialog box, click OK to restart the computer.
You can also download the following file from the Microsoft Download Center:
Download Q317277_wxp_sp1_x86_enu.exe now.
If the System Recovered Error Message Update (Q317277_WXP_SP1_x86_ENU.exe) does not resolve the issue, use the following steps to recreate the pagefile.
1. Click Start.
2. Right-click My Computer.
3. Click Properties.
4. On the Advanced tab, in the Performance section, click Settings.
5. In the Performance Options dialog box, click the Advanced tab.
6. In the Virtual Memory section, click Change.
7. For Paging file size for selected drive, click No Paging File, and then click Set.
8. You will see two warnings. Just click Yes on both of them
9. Select System Managed Size option.
10. Close all the dialog boxes and reboot.
Mac OS X 10.5: Software Update stops responding during "Configuring installation"
Symptoms
When attempting to update software using Software Update in Mac OS X 10.5, the update process may stop responding while "Configuring installation" is visible in the update window.
This can occur if Software Update attempts to install an update that was only partially downloaded.
Products Affected
Mac OS X 10.5, Mac OS X 10.5.3, Mac OS X 10.5.4, Mac OS X 10.5.1, Mac OS X 10.5.2, Mac OS X 10.5.5
Resolution
1. Quit (or if necessary, Force Quit) Software Update. Note: If the issue occurs while installing an update after log out (such as an update that requires a restart), shut down your Mac by holding down the power button, then power it back on.
2. Click the Finder icon in the Dock.
3. From the Go menu choose "Go to Folder".
4. Type: /Library/Updates
5. Click Go. The /Library/Updates folder opens.
6. Select all contents of this folder and move them to the Trash.
Once the above steps are complete, use Software Update again to re-download and install the update.
How do I change my short username in Mac OS X 10.4 (Tiger) and Mac OS X 10.5 (Leopard)?
A. Changing the short username in Mac OS X 10.4 (Tiger)
ChangeShortName is an easy-to-use utility that helps to change the short name of a user's account in Mac OS X (versions 10.4.x and 10.3.x). It can also repair some problems that occur when a user has attempted to change their short username manually and done so incorrectly. For safety, it backs up the NetInfo database beforehand. Download and install it.
Download Now.
Please read the documentation for information about compatibility with Mac OS X 10.2.x; ChangeShortName has not been tested with Mac OS X Server and is not compatible with Mac OS X 10.5 Leopard.
How to use ChangeShortName:
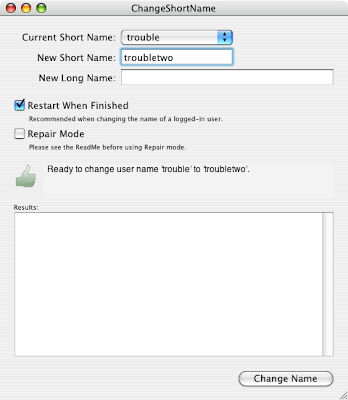
You simply choose the account you wish to modify, provide the desired new short username, and then click a button; ChangeShortName does the rest.
ChangeShortName also includes protections that make using it much safer than trying to change your short username manually.
Leopard (Mac OS X 10.5) users: The current version of ChangeShortName is not compatible with Leopard due to significant changes Apple made to Leopard. However, the good news is that Apple has provided in Leopard tools for changing your short username yourself.
B. Changing the short username in Mac OS X 10.5 (Leopard)
While it's easy to change your full username—an easily-accessible setting in Accounts preferences—the short username, which is also the name of your home folder in the Finder, seems unmodifiable.
In Leopard unlike previous versions of the Mac OS, Apple has finally given users a reasonably simple way to change the short username, and it's located right in System Preferences. You have three options.
Before you begin, have always a good backup.
1. The simple approach: account aliases
Like an alias in the Finder, which refers to an original file, and essentially functions as that original file when accessed, an account alias refers to an actual account name, and functions as that account name when typed.
To create an account alias, follow these steps:
Step 1. Open the Accounts pane of System Preferences. (You can do so from within your own account or from another account; you just need administrative access.)
Step 2. If the lock icon in the lower-left of the Accounts window is “locked,” click on it and provide an administrative username and password; this allows you to make changes.
Step 3. In the list of accounts on the left, right-click (or Control-click) on the name of the account you want to modify and choose Advanced Options from the resulting menu.
Step 4. In the Advanced Options screen, click the plus (+) button under Aliases and then type your desired account alias. (Do not make any other changes.)
Step 5. Click on OK.
Restart your Mac just to be sure all of OS X’s services are aware of it. From now on, any time you’re asked for your username and password, you can type your account alias instead of your actual short username. You can even access your personal Web Sharing Web site using your account alias (for example, http://yourIPaddress/~alias).
2. The Advanced Options screen of Accounts preferences
The next step up in complexity is to actually change your short username, but to leave your home folder (in the Finder) alone. This would let you log in using the new short username, and any dialogs in which your short username is automatically filled would use the new name, but your home folder in the Finder will still reflect your original name.
One potential issue to be aware of here: Some programs may store settings or preferences based on your short username. If you change that name, you may find that particular programs, and possibly even some OS X services, exhibit minor issues after making the change. The solution is usually as simple as viewing the settings interface for the offending program or service and changing whatever setting is causing the problem.
Here are the steps to follow:
Step 1. If Automatic Login is enabled (in Accounts preferences) for the account you’re modifying, disable it. Similarly, if File Vault is enabled (in Security preferences), disable it. You can re-enable these features, if desired, after completing the procedure.
Step 2. Log in as a different user than the one you want to modify; make sure the account you want to modify is not logged in.
Step 3. Open the Accounts pane of System Preferences.
Step 4. If the lock icon in the lower-left of the Accounts window is “locked,” click on it and provide an administrative username and password; this allows you to make changes.
Step 5. In the list of accounts on the left, right-click (or Control-click) on the name of the account you want to modify; choose Advanced Options from the resulting menu.
Step 6. In the Advanced Options screen, delete your current short username in the Short Name field, and then type in your desired new short username. (Do not make any changes to the Home Directory field.)
Step 7. Click on OK and close System Preferences.
Step 8. Restart your Mac.
After restarting, your original short username will no longer be valid; you’ll need to use your new name exclusively. Mac OS X automatically updates any groups to which your account belongs, and changes the path to your personal Web Sharing directory (for example, http://yourIPaddress/~newusername).
3. Changing your short username and the name of your home folder
These instructions assume your home folder is located in /Users:
Step 1. If Automatic Login is enabled (in Accounts preferences) for the account you’re modifying, disable it. Similarly, if File Vault is enabled (in Security preferences), disable it. You can re-enable these features, if desired, after completing the procedure.
Step 2. Log in as a different user than the one you want to modify; make sure the account you want to modify is not logged in.
Step 3. Open the Accounts pane of System Preferences.
Step 4. If the lock icon in the lower-left of the Accounts window is “locked,” click on it and provide an administrative username and password; this allows you to make changes.
Step 5. In the list of accounts on the left, right-click (or Control-click) on the name of the account you want to modify; choose Advanced Options from the resulting menu.
Step 6. In the Advanced Options screen, delete your current short username in the Short Name field, and then type in your desired new short username.
Step 7. In the Home Directory field, change /Users/oldusername to /Users/newusername, where oldusername is your original short username and newusername is your new short username. Make note of the original and new paths.
Step 8. Click on OK and close System Preferences.
Step 9.Open Terminal (in /Applications/Utilities).
Step 10. Type the following command, all on one line, and then press Return; when prompted, provide the password of the admin account you’re currently using, and then press Return again: sudo mv /Users/oldusername /Users/newusername (These are the original and new Home Directory paths from Step 7; oldusername is your original short username and newusername is your new short username.) This step renames your home folder in the Finder.
Step 11. Restart your Mac.
After the restart, your short username is completely changed, at least as far as Mac OS X is concerned—both your account name and the name of your home folder in the Finder have been updated.
How to stop Trackpad zooming on MacBook Pro when using Safari?
Mac users are once again frustrated with their new Macbooks and the multitouch Trackpad, especially the pich-zoom feature. Follows are some options on how to disable the pinch-zoom feature on the new MacBook.
If you have one of the new unibody MacBooks with the glass trackpad the following download will keep you from zooming in and out while using Safari, FireFox, Open Office and Google Chrome. Jeff Hawkins uploaded an InputManager application on his blog CubeYellow that will stop the zoom gesture when Safari or Firefox is active on any of the unibody MacBooks. Please follow the instructions below carefully to install it.
- Download the application.
- Quit out of Safari/FireFox and Mail.
- Unzip the download.
- Open Terminal.app
- cd /Library
- mkdir InputManagers - Note this directory might already be there. That is ok.
- Using the Finder copy the StopSafariZoomInputManager folder that you downloaded and unzipped. You need the whole folder... not just its contents.
- Using the Finder navigate to Machintosh HD/Library/InputManagers and choose paste - You will be prompted to enter your admin password. Note Machintosh HD is the name of my hard drive yours may be different.
- Go back to Terminal.app and run the following command: sudo chown -R root:admin /Library/InputManagers - Note you will be prompted for your admin password.
- Restart Safari and there will be no more zooming.
If you decide to uninstall you can just delete the /Library/InputManagers/StopSafariZoomingInputManager folder - you will be prompted to enter your admin password.
Some additional workarounds:
1. Change two-finger scrolling behavior.
Apple's trackpad demonstration videos show a hand with two fingers splayed and swiping on the pad to scroll around. This video may have some people assuming their fingers also must be splayed, when in fact they do not and keeping them splayed may create subtle in and out movements that can be interpreted as zoom gestures. If you are keeping your fingers apart, try holding your fingertips together when gesturing. This should anchor them together and prevent subtle spreading that may activate pinch-zooming.
2. Give "MultiClutch" a try.
There is a new multitouch gesturing utility out called "MultiClutch" from an independent developer that will assign application-specific tasks to a given multitouch gesture. This is convenient, because while there is no way to disable a specific gesture, you can do this for certain applications and assign a meaningless keystroke combination to the gesture that will prevent anything from happening.
Download MultiClutch.
Subscribe to:
Posts (Atom)