The Library Folder in Mac OS X Lion and Mountain Lion are hidden in your Home Folder.
To unhide the Library folder:
Open Terminal (Applications > Utilities > Terminal) and enter the command:
/usr/bin/chflags nohidden ~/Library
If you want to hide it again, enter the command:
/usr/bin/chflags hidden ~/Library
YOUR COMPUTER FIX-IT BLOG • Pulling your hair! Frustrated to no end! This blog covers hard-to-find answers to the most common tech questions for your PC, Mac and network. Do not fret! Call WareSales Inc. at 682.214.8078 and sign up for remote support plan at $199 for 1 whole year per PC.
Friday, December 21, 2012
Tuesday, December 4, 2012
How to fix "Failed to load Hamachi configuration"?
"Failed to load Hamachi configuration" can happen if another program corrupts your Hamachi configuration or identity information.
To fix it, do the following:
1. Click on Windows key + letter r
2. Type: appdata\Local\LogMeIn Hamachi
3. Delete everything in that folder
4. Restart Hamachi
To fix it, do the following:
1. Click on Windows key + letter r
2. Type: appdata\Local\LogMeIn Hamachi
3. Delete everything in that folder
4. Restart Hamachi
Thursday, September 20, 2012
How to dual-boot Windows 7 with Windows 8
To configure your PC for dual boot, you need to create a new partition for Windows 8, then install the system.
Caution: Before you begin, make sure to back up your system. This is a simple procedure, but there's always a risk of data loss whenever you modify disk partitions. If you have Norton Ghost or Acronis True Image handy, cloning your drive/partition is probably the best way to recover from any problems you might run into.
Create new partition in Windows 7
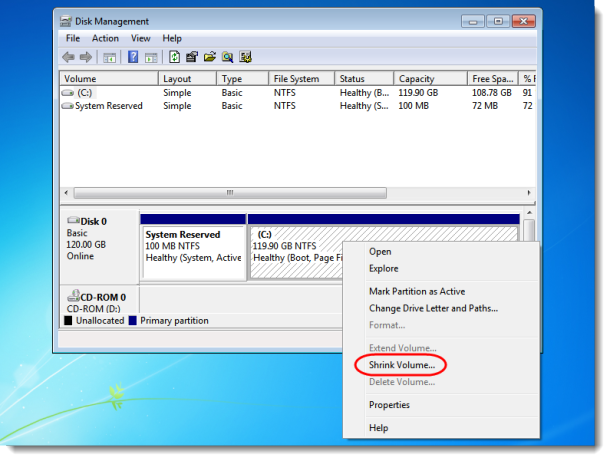
Step 1: In Windows 7, hit the shortcut Win+R, then type "diskmgmt.msc" to start Disk Management.
Step 1: In Windows 7, hit the shortcut Win+R, then type "diskmgmt.msc" to start Disk Management.
Step 2: To make room for Windows 8, you first need to shrink the C: volume. In Disk Management, right-click on your hard drive and select Shrink Volume, then choose how much space to shrink.
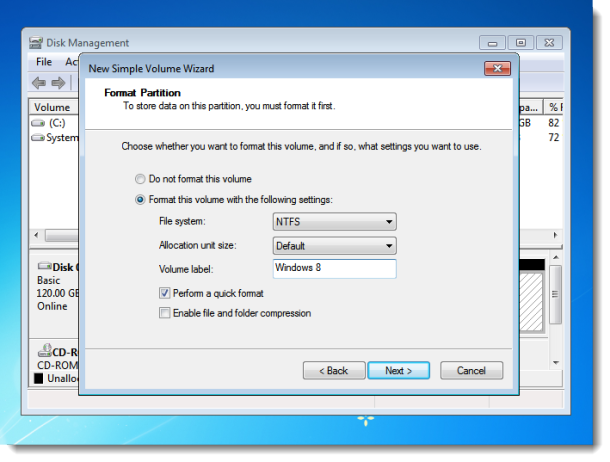
Step 3: Once the shrink task has completed, right-click on the unallocated partition, then select New Simple Volume. Go through the New Simple Volume Wizard and make sure to format the new partition in NTFS and give it a volume label, like "Windows 8."
Install Windows 8
Step 1: Insert a bootable Windows 8 DVD or USB flash drive into your PC, then reboot it to begin Windows 8 installation.
Step 1: Insert a bootable Windows 8 DVD or USB flash drive into your PC, then reboot it to begin Windows 8 installation.
Step 2: When prompted to choose the type of installation, choose Custom.
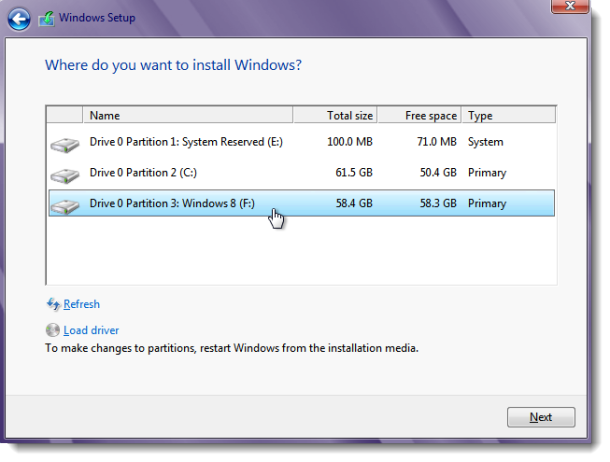
Step 3: For the location of your Windows 8 install, select the new partition you created.
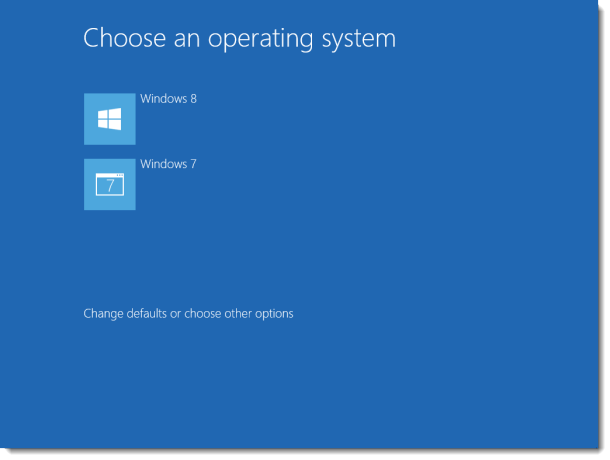
Once Windows 8 finishes installing, the boot menu will appear with both Windows 8 and Windows 7. By default, Windows 8 will start automatically after 30 seconds, but you can set Windows 7 as the default by clicking on "Change defaults or choose other options" from the boot menu.
Friday, March 9, 2012
Quicken 2007 for Lion
Intuit has finally released an update to Quicken 2007 compatible with Lion. You can purchase and download it at: Quicken 2007 for Lion.
How to Sync Your Android Phone to a Mac or PC
There's no iTunes for Google Android phones, but there are alternative easy ways to sync your media, contacts and calendar to any Android device.
Getting Started
If you're just getting started with your Android phone, you'll be forced to set up a Google Gmail account. Use it; don't neglect it. It might seem a little unreasonable to have to use a new e-mail address just to use your phone, but trust us—it's easier than the other options. First up, open a Gmail account and sync everything you can with it. You'll want to sync your contacts, your calendar, and whatever else you can to your new account. Google's flurry of services—Maps, Buzz, YouTube, and more—all tie seamlessly with Android's interface, so using them all with a single account from your phone makes your Android experience much richer.
Media
For syncing music, videos, and pictures to your Android phone, doubleTwist is your best choice. doubleTwist imports iTunes playlists and automatically reformats almost any kind of non-DRMed media into the right format for your phone. The software itself is a little bland, but it makes it easy to put your media on your smartphone. Read the doubleTwist review for more information about syncing your media, but remember that iTunes-purchased videos won't sync to your phone (it's that pesky DRM.)
Of course, you can also drag and drop files onto a microSD card. But dragging and dropping files won't let you keep your playlists or help you convert video files. doubleTwist can help you with both of those.
E-mail
If you really want to embrace Android, you have to embrace Gmail. The Android Gmail client is simply more feature-rich than any other e-mail option. If you're not going to use Gmail as your personal e-mail, you'll have to manually set up your e-mail using POP3,IMAP, or Microsoft Exchange ActiveSync, which is supported by almost all Android phones. Select the general Email icon from the app selection screen and input your details there.
Contacts
After you've set up a Google account, you can import your contacts. Access your contacts by tapping Android's Contacts icon. To get your contacts into the Google account, you'll have to export them from your existing software as a CSV file. You can also import your contacts from Outlook, Outlook Express, Yahoo Mail, or Hotmail by exporting them to a CSV file. In Yahoo, for example, click Contacts, then Tools, then Export, and select the Yahoo CSV option. To import the CSV file, open Gmail on your PC (not your phone!), click the Contacts tab on the left-hand side, then click the import button. Select the CSV file in Google from wherever you stashed the CSV file on your PC.
Calendar
All Android phones support Google Calendar, Google's online calendar program. Many also support Microsoft Exchange calendars. If you use a different calendar program, you'll have to sync it over to a Google calendar to see it on your phone.
Syncing from Microsoft Outlook
Google provides an official app that can sync your Outlook calendar to your Google Calendar and vice versa. However, if you have a version of Outlook older than 2003, then the best you'll be able to do is export calendar items to a CSV file and import them to your calendar manually. To do this, select the File tab in Outlook and click "Import and Export." Select "Export to a file", pick Comma Separated Values (CSV), and select the calendar you want to export. Then, go into Google Calendar, click the Settings tab, click Import Calendar, and select the CSV file you exported earlier.
Syncing from iCal and Mozilla Sunbird
Google provides easy-to-follow directions if you want your Google Calendar to sync with Apple's iCal or Mozilla Sunbird.
Syncing from Microsoft Entourage
Recent versions of Entourage allow you to sync your calendar with iCal, but not directly with Google Calendar. Go to Sync Services under your Preferences in Entourage and select "Sync to iCal." Once you do that, follow the iCal to Google Calendar instructions.
Sunday, February 26, 2012
How to Burn Your Own OS X Lion and OS X Mountain Lion Install DVD or USB Flash Drive
1) Download Lion from the Mac App Store. The installer usually shows up in your Applications folder. Make a duplicate of the installer in your Applications in case anything goes wrong.
2) Right-click on the installer and hit "Show Package Contents". Navigate to Contents > SharedSupport and look for a file called "InstallESD.dmg".
3) Open up Disk Utility and drag the DMG file into the left-hand sidebar. If you're burning it to a DVD, insert your DVD, select the disk image in the sidebar, and hit the "Burn" button. Skip down to the last step to use it.
4) If you want to burn Lion to a USB flash drive, plug it in and click on it in the left-hand sidebar in Disk Utility. Go to the Partition tab and select "1 Partition" from the dropdown menu. Choose "Mac OS Extended (Journaled) on the left.
5) Hit the Options button under the partition table and choose "GUID Partition Table". You'll need this to make the drive bootable on a Mac. Hit the Apply button when you're done to format your drive (note: it will erase everything on the drive).
6) Click on the "Restore" tab, choose the InstallESD.dmg file as the source and your flash drive as the destination. Hit the Apply button and it will create your bootable USB drive.
7) Reboot into OS X and hold the option key when you hear the startup chime. You can boot into your DVD or flash drive from there.
Note: You'll not only be able to install Lion from this drive, but you'll also be able to use Disk Utiltiy, recover from a Time Machine backup, and do everything else you could do with the old installation DVDs. Note that when you install Lion, it'll create a recovery partition with all these features anyway, so you don't need the DVD unless you're doing a clean install. Though it's always nice to have around in case something happens, like you erase your entire drive.
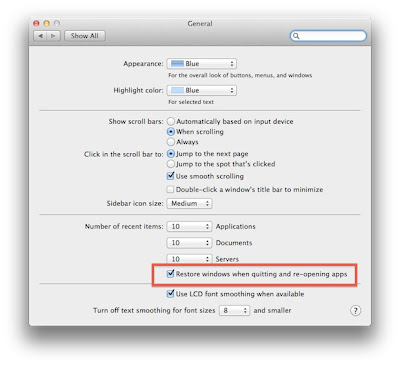
How to Disable Window Restoration in Lion?
1) Launch System Preferences and click on the “General” icon
2) At the bottom of the “Number of recent items” list, uncheck the checkbox next to “Restore windows when quitting and re-opening apps”.
Note: This is a sweeping change that impacts all applications and the Finder itself, meaning all apps will no longer save their previous state, including when you reboot your Mac.
Ungrouping a Conversation in Apple Mail
1) Launch Apple Mail.
2) Go to "View" on the top and uncheck the "Organize by Conversation" option.
Note: Apple Mail cannot determine which messages go in which conversations. This seems like a software bug.
2) Go to "View" on the top and uncheck the "Organize by Conversation" option.
Note: Apple Mail cannot determine which messages go in which conversations. This seems like a software bug.
Can anyone write to us and tell us why Apple Mail groups messages that are not in the same conversation?
Friday, January 27, 2012
How to Replace your Lenovo Thinkpad X Series X61 Laptop Keyboard
Prior to replacing your Lenovo Thinkpad X Series X61 laptop keyboard, make sure to remove the battery and disconnect the ac adapter from your laptop.
Step 1: The first step to replacing your laptop keyboard is to remove the screws from the back of your Lenovo Thinkpad X Series X61. Sometimes your laptop will have a picture of a keyboard next to the screws that need to be removed. Otherwise, see your X61 laptop manual for details.
Above your Lenovo X61 laptop keyboard, you have a cover panel. If required, remove this part to easily access your Lenovo keyboard.
If you have screws above your Lenovo Thinkpad X Series X61 Keyboard, remove those screws.
Step 2: To remove your X61 Keyboard, take a thin object and pry the keyboard out between the keyboard and motherboard. Be careful when removing your Lenovo Thinkpad X Series X61 Keyboard.
Step 3: Now that your keyboard is loose, simply disconnect your Lenovo X61 keyboard. In order to disconnect the keyboard, pay attention to the keyboard connector and connector cable. Unlock the connector cable device and remove your laptop keyboard. Your Lenovo X61 connector cable should be easy to remove by simply sliding it out.
Step 4: Now that your X61 keyboard has been removed, get ready to install your new Lenovo X61 laptop keyboard. Look at the back of the keyboard. If you see any screw holes, you will have a good idea of where to place the screws back in at the bottom of your Lenovo Thinkpad X Series X61 laptop.
Step 5: Connect your Lenovo X61 keyboard to the motherboard keyboard connection slot. Secure the X61 keyboard cable. Now turn your keyboard in place, and align the grooves on the bottom of your keyboard with your palmrest or plastic bezel. Secure your laptop keyboard in place, make sure it fits properly and is snug. Now simply place the screws back in place.
Subscribe to:
Posts (Atom)
