Symptoms
When you try to install or remove Microsoft Office 2003 or Microsoft Office XP SP1, you may receive an error message that is similar to the following:
The installation source for this product is not available. Verify that the source exists and that you can access it.
Cause
This issue may occur if you have one or more stand-alone versions of a Microsoft Office 2003 or Microsoft Office XP program, such as Microsoft FrontPage 2002/2003, Microsoft Publisher 2002/2003, or Microsoft Access 2002/2003 installed on your computer.
Resolution
To resolve this issue, use the Microsoft Windows Installer CleanUp Utility to remove the stand-alone programs. To do this, follow these steps.
1. Download and install the Windows Installer CleanUp Utility.
2. Remove the Stand-Alone Programs.
- Click Start, point to Programs, and then click Windows Install CleanUp.
- On the list of installed programs, click each Microsoft Office program, and then click Remove.
- Follow the instructions that appear on the screen to complete the removal process.
- When the removal process is completed, click Exit.
Monday, October 26, 2009
Wednesday, October 14, 2009
Windows Firewall Options Grayed Out: Cannot Turn ON / OFF Windows Firewall
You are unable to turn on the Windows Firewall. You cannot enable or disable the Windows Firewall as the options of turning on and off of the firewall were grayed out as shown in the image below.
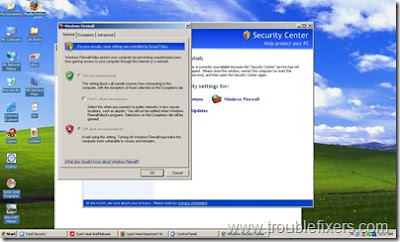
This type of problem occurs when your computer has been infected by some virus which you may have removed from your computer but some infections caused by the virus remains. Note that there are a plethora of Viruses which disable the Windows Firewall settings through Policy / registry settings, even in Windows XP Home Edition. Therefore, it's a good idea to run a complete Virus scan in your system.
Let’s find out how can you resolve this problem of firewall turn on/off options disabled.
Method 1:
The viruses normally create these registry entries which disable and gray out the turn on/off controls in Windows Firewall.
[HKEY_LOCAL_MACHINE\SOFTWARE\Policies\Microsoft\WindowsFirewall\DomainProfile] "EnableFirewall"=dword:00000000 [HKEY_LOCAL_MACHINE\SOFTWARE\Policies\Microsoft\WindowsFirewall\StandardProfile] "EnableFirewall"=dword:00000000
- If values of the above keys is set to 0, it will disable and it grays out the firewall controls so it cannot be changed.
- If the value of the above keys is set to 1, it will enable it and grays out the firewall controls so it cannot be changed.
Click Start\Run and type Gpedit.msc and check the firewall settings. Otherwise, try logging in as Administrator and see if it's different.
Failing that, try deleting these 2 registry keys if they exist. Restart you computer to see the effect.
Method 2: For Windows XP Home Edition and Professional Edition
1. Open Start Menu/Run, type regedit and press Enter key
2. Navigate To the following path
HKEY_LOCAL_MACHINE \ SOFTWARE \ Policies \ Microsoft \ WindowsFirewall
3. Make sure to export and backup WindowsFirewall key and close registry
Method 3: For Windows XP Professional Edition only
1. Open Start Menu/Run, type gpedit.msc and press Enter key
2. Navigate to the following path
Computer Configuration >> Administrative Templates >> Network >> Network Connections >> Windows Firewall >> Standard Profile
3. Close Group Policy Editor
4. When it is done, you may need to restart your computer
Method 4: Resetting your firewall policy, for a stand-alone system with Windows XP Home or Professional
1. Click Start, Run and type Regedit.exe
2. Navigate to the following location:
HKEY_LOCAL_MACHINE \ SOFTWARE \ Policies \ Microsoft \ WindowsFirewall.
3. Back up the key and then delete the WindowsFirewall branch.
4. Close Regedit.exe and restart Windows.
Method 5: Resetting your firewall policy, for a stand-alone system with Windows XP Professional only
1. Click Start, Run and type Gpedit.msc
2. Navigate to the following branch:
Computer Configuration => Administrative Templates
==> Network ===> Network Connections ====> Windows Firewall =====> Standard Profile
3. Set the following options to Not Configured (defaults)
Windows Firewall: Protect all network connections
Windows Firewall: Do not allow exceptions
Windows Firewall: Define program exceptions
Windows Firewall: Allow local program exceptions
Windows Firewall: Allow remote administration exception
Windows Firewall: Allow file and printer sharing exception
Windows Firewall: Allow ICMP exceptions
Windows Firewall: Allow Remote Desktop exception
Windows FIrewall: Allow UPnP framework exception
Windows Firewall: Prohibit notifications
Windows Firewall: Allow logging
Windows Firewall: Prohibit unicast response to multicast or broadcast requests
Windows Firewall: Define port exceptions
Windows Firewall: Allow local port exceptions
4. Exit Group Policy editor.
You can also view a video below:
Monday, October 12, 2009
"SMART Threshold Exceeded" warning
A "SMART Threshold Exceeded" warning appears after startup of your PC.
What is T.E.C. ("Threshold Exceeded Condition")?
T.E.C. is "Threshold Exceeded Condition" and basically it means a disk failure.
Disk drives have spare sectors that can be used to reallocate sectors that go bad during normal operation. If you are getting that message (SMART Threshold Exceeded) on your drive, then more sectors have been reallocated than are recommended by the disk drive manufacturer.
What to do?
It is possible that you will not see that message again, and it will work fine from now on. But it is more likely that eventually that drive will stop working completely. During the time the drive is not working, your redundant RAID array will be degraded. So we recommend replacing that disk drive. If the disk drive is under warrantly, you can send it to the manufacturer for replacement or repair. Contact the manufacturer of your disk drive for their RMA policy.
Utility to check your drive for T.E.C.
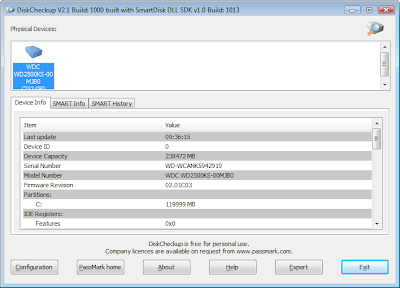
Download DiskCheckup to monitor the SMART attributes of a particular hard disk drive. SMART (Self Monitoring Analysis & Reporting Technology ) is an interface between a computer's BIOS (basic input/output system) and the computer hard disk. It is a feature of the Enhanced Integrated Drive Electronics (EIDE) technology that controls access to the hard drive. If S.M.A.R.T is enabled when a computer is set up, the BIOS can receive analytical information from the hard drive and determine whether to send the user a warning message about possible future failure of the hard drive.
SMART monitors elements of possible long term drive failure, such as 'Spin Up Time', the number of start/stops, the number of hours powered on and the hard disk temperature.
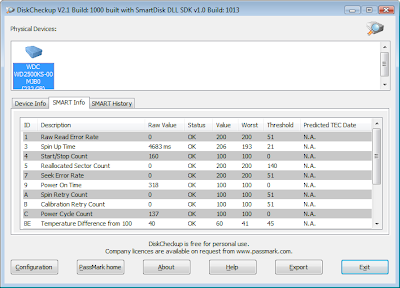
DiskCheckup displays the current values of the SMART attributes, along with the Threshold value for that attribute. If any attribute value is close to or below the threshold, the drive is no longer reliable and should be replaced.
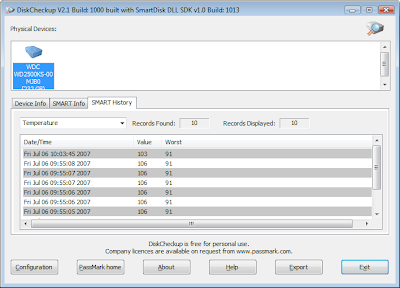
Note that SMART attributes change slowly over time and are helpful attempts to diagnose the life span of a particular drive. DiskCheckup monitors these changes over a long period and predict the date (if available) of the Threshold Exceed Condition (TEC), which is displayed on the main window.
DiskCheckup also displays some additional drive information, such as the drive serial number, model number, firmware version, device capacity, partition capacities, the number of cylinders, tracks, the sectors per track.
E-mail notification when Threshold Exceed Condition detected
DiskCheckup can be configured to perform e-mail notification when a SMART attribute has been detected to be less than the allowable threshold value. Such threshold values are determined by the hard disk manufacturer. For a drive to be considered "good", all the SMART attributes must be above these values. Different SMART attributes have different threshold values.
Hardware RAID and SCSI are not supported. But dynamic disks (software RAID) are supported. The majority of drives connected via USB and Firewire are not supported. (The protocol bridge between the USD and ATA protocols doesn't seem to support SMART data).
What is T.E.C. ("Threshold Exceeded Condition")?
T.E.C. is "Threshold Exceeded Condition" and basically it means a disk failure.
Disk drives have spare sectors that can be used to reallocate sectors that go bad during normal operation. If you are getting that message (SMART Threshold Exceeded) on your drive, then more sectors have been reallocated than are recommended by the disk drive manufacturer.
What to do?
It is possible that you will not see that message again, and it will work fine from now on. But it is more likely that eventually that drive will stop working completely. During the time the drive is not working, your redundant RAID array will be degraded. So we recommend replacing that disk drive. If the disk drive is under warrantly, you can send it to the manufacturer for replacement or repair. Contact the manufacturer of your disk drive for their RMA policy.
Utility to check your drive for T.E.C.
Download DiskCheckup to monitor the SMART attributes of a particular hard disk drive. SMART (Self Monitoring Analysis & Reporting Technology ) is an interface between a computer's BIOS (basic input/output system) and the computer hard disk. It is a feature of the Enhanced Integrated Drive Electronics (EIDE) technology that controls access to the hard drive. If S.M.A.R.T is enabled when a computer is set up, the BIOS can receive analytical information from the hard drive and determine whether to send the user a warning message about possible future failure of the hard drive.
SMART monitors elements of possible long term drive failure, such as 'Spin Up Time', the number of start/stops, the number of hours powered on and the hard disk temperature.
DiskCheckup displays the current values of the SMART attributes, along with the Threshold value for that attribute. If any attribute value is close to or below the threshold, the drive is no longer reliable and should be replaced.
Note that SMART attributes change slowly over time and are helpful attempts to diagnose the life span of a particular drive. DiskCheckup monitors these changes over a long period and predict the date (if available) of the Threshold Exceed Condition (TEC), which is displayed on the main window.
DiskCheckup also displays some additional drive information, such as the drive serial number, model number, firmware version, device capacity, partition capacities, the number of cylinders, tracks, the sectors per track.
E-mail notification when Threshold Exceed Condition detected
DiskCheckup can be configured to perform e-mail notification when a SMART attribute has been detected to be less than the allowable threshold value. Such threshold values are determined by the hard disk manufacturer. For a drive to be considered "good", all the SMART attributes must be above these values. Different SMART attributes have different threshold values.
Hardware RAID and SCSI are not supported. But dynamic disks (software RAID) are supported. The majority of drives connected via USB and Firewire are not supported. (The protocol bridge between the USD and ATA protocols doesn't seem to support SMART data).


Thursday, September 10, 2009
The nv4_disp problem and fix
The nv4_disp problem
When a Dell Dimension greets you with a Blue Screen of Death (BSOD) your computer will not boot up.
After booting into Safe Mode first and then rebooting the computer, I was able to get an error on boot that gave me some idea of the problem. The error message said that the “nv4_disp” driver was apparently caught in an infinite loop.
The nv4_disp fix
Here are 5 easy steps to fix the problem.
1) Boot your computer into Safe Mode w/ Networking. For Windows XP users, this is accomplished by pressing F8 repeatedly when your computer is booting up. You will be presented with several options. Choose “Safe Mode w/ Networking.” This will boot Windows XP into Safe Mode, but you will be able to connect to the Internet and browse the Web.
2) Go to NVIDIA’s Web site and download the latest display drivers for Windows XP. Save the 20MB file to your desktop for easy locating later on.
3) Remove the NVIDIA display drivers currently installed on your machine. To do this, right click on “My Computer,” then select Properties. Click the “Hardware” tab, then click “Device Manager.” You now see a list of hardware devices installed on your computer. Double click “Display Adapters.” You should now see your NVIDIA card listed. Click it once to highlight it, then click the “Uninstall” icon in the upper right of Device Manager menu. The NVIDIA drivers are removed from your machine.
4) Install the updated NVIDIA display drivers. Double-click the NVIDIA setup file you saved to the desktop earlier. The installation will run its course.
5) Reboot your computer.
Sunday, September 6, 2009
RAID Configuration with ORCA on a HP PC
You decide to install a Microsoft OS (client or server) and create a RAID 1 on a HP PC client or server. You can use ORCA, a simple ROM-based configuration utility that runs on all operating systems.
When using an HP Smart Array controller as your boot controller, use the Option Rom Configuration for Arrays (ORCA) utility to configure your logical boot drive. The ORCA utility can only be accessed when the system is booting.
To create a logical drive using ORCA, follow these steps:
1. Press the F8 key when the prompt appears on the screen during boot to start ORCA and configure your logical boot drive.
2. Select Create Logical Drive. The screen displays a list of all available (unconfigured) physical drives and the valid RAID options for the system.
3. Use the Arrow keys, Spacebar, and Tab to navigate around the screen and set up the logical drive, including an online spare drive if one is required.
NOTE: You cannot use ORCA to configure one spare drive to be shared among several arrays.
4. Press Enter to accept the settings.
5. Press F8 to confirm the settings and save the new configuration. After several seconds, the Configuration Saved screen appears.
6. Press Enter to continue. You can now create another logical drive by repeating the previous steps.
NOTE: Newly created logical drives are invisible to the operating system. To make the new logical drives available for data
storage, format them using the instructions given in the operating system documentation.
ORCA Limitations
For the most efficient use of drive space, do not mix drives of different capacities within the same array. The configuration utility treats all physical drives in an array as if they have the same capacity as the smallest drive in the array. The excess capacity of any larger drives is wasted because it is unavailable for data storage.
The probability that an array will experience a drive failure increases with the number of physical drives in the array. If you configure a logical drive with RAID 5, keep the probability of failure low by using no more than 14 physical drives in the array.
Saturday, September 5, 2009
How do I remove boot choices when I start up Microsoft Windows XP?
I have 2 partitions on my computer. Every time I boot my PC, I have to choose between starting with my original Windows XP Pro or Windows XP Pro Setup. And if I choose for the setup, my computer crashes.
To get rid of your boot choice, apply the following steps.
1) There is a hidden file in the root of your boot drive, called "boot.ini". It controls what happens at boot time.
Right click on My Computer, and select Properties.
2) Now click on the Advanced tab. In a section labeled Startup and Recovery click on the button labeled Settings. You should see the dialog box pictured below:
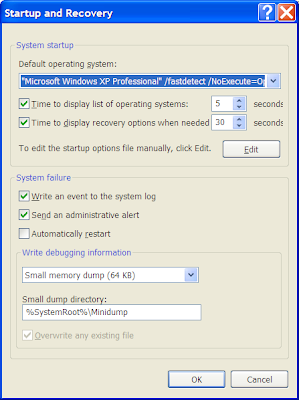
3) Click on Edit to edit the startup options file (aka boot.ini) manually. That should open Notepad with something similar to the following from my machine:
[Boot Loader]
Timeout=5
Default=C:\$WIN_NT$.~BT\BOOTSECT.DAT
[Operating Systems]
multi(0)disk(0)rdisk(0)partition(3)\WINDOWS="Microsoft Windows XP Home Edition" /noexecute=optin /fastdetect
C:\$WIN_NT$.~BT\BOOTSECT.DAT="Microsoft Windows XP Professional Setup"
4) In this example, you can see that I have two options to choose from when I boot: Windows XP Home Edition and Windows XP professional Setup. You can simply delete the second line and save the file.
5) When you next reboot you should no longer have that additional option. But if there is still a second boot showing as "Windows (Default)", then change the line "Default=C:\$WIN_NT$.~BT\BOOTSECT.DAT" with "default=multi(0)disk(0)rdisk(0)partition(3)\WINDOWS" and save the file once again. The file should look as shown below:
[boot loader]
timeout=30
default=multi(0)disk(0)rdisk(0)partition(3)\WINDOWS
[operating systems]
multi(0)disk(0)rdisk(0)partition(3)\WINDOWS="Microsoft Windows XP Home Edition" /noexecute=optin /fastdetect
Monday, August 31, 2009
How do I uninstall the Vuze Toolbar for Safari (Mac)?
If you want to remove the Vuze toolbar for Safari, just go to Finder and click on Applications, then Toolbars, then Vuze.
In that folder, double click on "uninstall".
If you don't see the Toolbars folder in Applications, check under the main Applications folder instead of the user folder: Click on your hard drive under Devices in Finder, then Applications, then Toolbars.
You might need to provide the administrator password to complete the process.
Remove and reenter the Microsoft Office 2008 for the Mac product key
If your copy of Office 2008 was installed with an invalid product key, i.e., a sequence of 25 letters and numbers, you must reenter the product key to activate Office. The product key sticker is located on the back of the installation CD sleeve or case., or if you mistakenly used the same product key to install Office 2008 on more than one computer, you must remove the invalid product key and enter a valid product key to use Office 2008.
1) In the Finder, select /Applications/Microsoft Office 2008/Office/OfficePID.plist, and then on the File menu, click Move to Trash.
2) Select /Users/username/Library/Preferences/Microsoft/Office 2008/Microsoft Office 2008 settings.plist, and then on the File menu, click Move to Trash.
3) On the Apple menu, click Restart.
4) After your computer restarts, open any Office 2008 application. The Office Setup Assistant opens.
5) Accept the software license agreement, and then enter your valid product key. The product key is located on the back of the Office 2008 for Mac DVD sleeve or on the back of the Install Guide.

How to fix the error "This Device Cannot Start. (Code 10)" when plugging a USB device in Windows XP?
If you have plugged in a USB device (usually a mass storage device) into a computer and it doesn't work, here are some basic troubleshooting steps to resolve the problem.
First, you want to rule out any problems with the device itself. A good way to do this is to plug the USB device into a different computer to see if it works there. If it does not work in a different computer, then the problem is with the device itself. USB devices, although very handy and portable, can fail just like any other device.
However, if the USB device works in another computer system, then the problem lies with the configuration of the computer where the device did not work.
Follow the steps below to troubleshoot this scenario and make your USB device work again.
1) If you are using a USB cable with your device, check the cable to make sure it matches the speed of the device. Use USB 2.0 cables with USB 2.0 devices and USB 1.1 cables with USB 1.1 devices. Swap cables and check the device, if this does not work, proceed to Step 2.
2) Next, open Device Manager and look under the heading for USB Serial Bus Controllers. If there is a device with a yellow exclamation mark next to it such as USB Mass Storage Device. Double-click on the entry and check the Device Status. If the status shows something like "This device cannot start. (Code 10)" proceed to Step 3.
3) The easiest way to solve a USB error code 10 in Windows XP is to follow the steps below to remove and reinstall all USB controllers.
A. Click on Start.
B. Right Click on My Computer, click on Properties.
C. Click on the Hardware tab .
D. Click the Device Manager button.
E. Expand Universal Serial Bus controllers section.
F. Right-click every device under the Universal Serial Bus controllers node, and then click Uninstall to remove them one at a time.
G. Restart the computer, and allow the computer to reinstall the USB controllers.
H. Plug in the removable USB storage device, and then test to make sure that the issue is resolved.
Problem with Error 10 Code?
Error 10 Codes are caused in one way or another by misconfigured system files. So, If you got error 10 then there is a 94% chance that your computer has registry problems.
To Fix the problem you need to follow the steps below:
1) Download RegCure Registry Scan or at this alternate site for free and install it.
2) Click the Scan Button.
3) Click the Fix Button and you're done!
Saturday, August 29, 2009
NComputing: Updated X-series vSpace releases for Microsoft update KB956572
Overview:
This notice is to advise that NComputing has released X-series vSpace updates on April 24 to allow the installation of Microsoft KB956572, the releases are:
X-series: X550 and X350 4.04.006
X300 4.03.102
We notified you regarding an incompatibility with the Microsoft update KB956572 and NComputing vSpace software (see below). We have updated our software for the X-series to be compatible with this Microsoft patch and our new software is available now.
You can download the NComputing software update in either of the following two ways:
1. For the X300, X350 or X550 run the NComputing update utility on your NComputing host systems. This utility will download the setup software for the appropriate version of vSpace for your hardware.
Updating vSpace or Terminal Services Software:
Once you have successfully completed the registration process, you can update the terminal services program directly over the Internet by selecting “NCX-2000-XP Internet Update” or vSpace update from the “Start” menu. (If the “Enter Password” window appears, enter the administrator password.)
Click the “Connect” button to check for a software update and click on the “Download” button to start the download process.
When the download is complete, the installation of the new version will begin; just follow in the instructions in the installation wizard.
2. For the X550/X350 you can login and download the software directly from the Software Download Center in the Support section of our website. Please note that if you have not already done so, you will be prompted to create an online account to access the software this way.
IMPORTANT: During the update process you will be prompted to uninstall the current version of NComputing software – when doing so, be sure to keep your registration data active (do NOT select “unregister” when prompted).
Once you have installed the updated NComputing software, you can proceed to install the Microsoft KB956572 patch, if desired. Again, we recommend that you turn off automatic Microsoft updates so that you can first confirm and/or test compatibility with all of your installed software applications before deploying them.
Previous Announcement
Microsoft OS Automatic Update Incompatibility (KB956572)
Overview:
This notice is to advise that on April 14, Microsoft released eight updates for the Windows operating system that are known to affect 3rd party software. One of these eight updates (KB956572) is incompatible with NComputing vSpace software for the X-series and L-series. For more information from Microsoft on these new updates, please see the following articles:
Update Summary: http://support.microsoft.com/kb/894199
Microsoft Security Bulletin: http://www.microsoft.com/technet/security/Bulletin/ms09-012.mspx
It is clear that these updates were expected to affect numerous independent software vendor’s (ISV) applications as Microsoft has provided an extensive set of Q & A information to assist ISVs in working around the resulting issues. This information is included in this article: http://support.Microsoft.com/?kbid=956572. Microsoft does not give most 3rd party ISV's advanced notice of these updates.
Symptoms of Incompatibility:
After installing these updates, NComputing users are encountering several major symptoms. With NComputing L series access devices, an attempt to connect to the host will result in a "Terminal Server not ready..." error message. With X -series systems, the screens repeatedly "flash" and briefly display a "winlogon terminated" error message.
Workaround:
While an NComputing patch for this issue is being developed, the recommended workaround is to remove the one Windows update causing the issue. The other seven Microsoft updates can remain in place. To remove the update causing this issue, please take the following steps:
1) Open the "Start Menu"
2) Open "Control Panel"
3) Open "Add/Remove Programs"
4) Check the box marked "Show updates"
5) Locate and select the Microsoft Security Update "KB956572"
6) Click "Remove"
7) Confirm removal of the update
8) Reboot your computer.
NComputing is working to understand the changes made by these Microsoft OS updates. As soon as we have an NComputing software update, we'll make it available through our standard update process.
Best Practice to Avoid Similar Issues in the Future:
NComputing recommends that administrators and users do not set their operating system to automatically accept and install Microsoft updates. It is best to manually download and install the updates only after it can be confirmed that any third party software that you are using is unaffected. This is especially important for large installations and it is recommended to test the updates on a single system first before deploying to all host computers.
How do I install the SATA Drivers for a Dell Dimension 8400 hard drive?
What to do when a Dell Dimension 8400 does not recognize the SATA hard drive for a reformat or a new install?
1. If you don’t have your resource CD then you will need to first download the drivers for the SATA raid controller. Click here to download the drivers.
You will need to get a blank floppy and run the .exe program (R82876.exe) you downloaded from Dell. Run that and it will create a floppy disk with the drivers for you.
2. Go into your bios and change the mode of your SATA controller to a mode called “combination”.
3. Reboot and boot from your Windows installation CD.
4. Press the F6 key to install a third party SCSI or RAID driver..
5. When prompted, select 'S' to Specify Additional Device.
6. When prompted, insert the floppy disk you created in step 1 and press Enter.
7. At this point you should be presented with a selection for one of the following depending on you hardware version and configuration:
- Intel(R) 82801FR SATA RAID Controller
- Intel(R) 82801FR SATA AHCI Controller
8. Highlight the selection that is appropriate for the hardware in your system and press Enter.
9. Press Enter again to continue. Leave the floppy disk in the system until the next reboot as the software will need to be copied from the floppy disk again when setup is copying files.
10. Continue to install the rest of Windows.
Key Note: You must change the SATA controller in BIOS to “combination” or you install will never see the drive.
How can I write or burn ISO files to CD or DVD?
ISO files are actually images of complete CDs or DVDs compiled as one whole image file (*.iso), just like Ghost does for hard disks and partitions. ISO images can be loaded into several different CD/DVD recording software packages to create CDs or DVDs.
ISO Recorder Power Toy (Freeware)
ISO Recorder is a Windows XP freeware utility that uses native Windows XP functions to write images to a CD. To download the utility, click here. When the program is installed, it is automatically associated with the ISO file extension in Windows Explorer.
Steps to create a CD if you have installed ISO Recorder Power Toy:
1) Download the ISO CD image to a folder on your computer.
2) Insert a blank CD in your CD-RW drive.
3) Start Windows Explorer.
4) Locate the ISO file, right-click the file name, and then click Copy image to CD to open the ISO Recorder Wizard.
5) Follow the steps in the wizard to write the image to the CD.
Another alternate method:
1) You can also right-click your CD-R drive and choose Copy Image to CD.
2) In the new window browse to the ISO file and click Next.
ISO Recorder Power Toy (Freeware)
ISO Recorder is a Windows XP freeware utility that uses native Windows XP functions to write images to a CD. To download the utility, click here. When the program is installed, it is automatically associated with the ISO file extension in Windows Explorer.
Steps to create a CD if you have installed ISO Recorder Power Toy:
1) Download the ISO CD image to a folder on your computer.
2) Insert a blank CD in your CD-RW drive.
3) Start Windows Explorer.
4) Locate the ISO file, right-click the file name, and then click Copy image to CD to open the ISO Recorder Wizard.

5) Follow the steps in the wizard to write the image to the CD.
Another alternate method:
1) You can also right-click your CD-R drive and choose Copy Image to CD.

2) In the new window browse to the ISO file and click Next.

How to wire an Ethernet cable?
The information listed here is to assist Network Administrators in the color coding of Ethernet cables. Please be aware that modifying Ethernet cables improperly may cause loss of network connectivity. Use this information at your own risk, and insure all connectors and cables are modified in accordance with standards. The Internet Centre and its affiliates cannot be held liable for the use of this information in whole or in part.
The TIA/EIA 568-A standard which was ratified in 1995, was replaced by the TIA/EIA 568-B standard in 2002 and has been updated since. Both standards define the T-568A and T-568B pin-outs for using Unshielded Twisted Pair cable and RJ-45 connectors for Ethernet connectivity. The standards and pin-out specification appear to be related and interchangeable, but are not the same and should not be used interchangeably.
Both the T-568A and the T-568B standard Straight-Through cables are used most often as patch cords for your Ethernet connections. If you require a cable to connect two Ethernet devices directly together without a hub or when you connect two hubs together, you will need to use a Crossover cable instead.
A good way of remembering how to wire a Crossover Ethernet cable is to wire one end using the T-568A standard and the other end using the T-568B standard. Another way of remembering the color coding is to simply switch the Green set of wires in place with the Orange set of wires. Specifically, switch the solid Green (G) with the solid Orange, and switch the green/white with the orange/white.
Ethernet Cable Instructions:
1) Pull the cable off the reel to the desired length and cut. If you are pulling cables through holes, its easier to attach the RJ-45 plugs after the cable is pulled. The total length of wire segments between a PC and a hub or between two PC's cannot exceed 100 Meters (328 feet) for 100BASE-TX and 300 Meters for 10BASE-T.
2) Start on one end and strip the cable jacket off (about 1") using a stripper or a knife. Be extra careful not to nick the wires, otherwise you will need to start over.
3) Spread, untwist the pairs, and arrange the wires in the order of the desired cable end. Flatten the end between your thumb and forefinger. Trim the ends of the wires so they are even with one another, leaving only 1/2" in wire length. If it is longer than 1/2" it will be out-of-spec and susceptible to crosstalk. Flatten and insure there are no spaces between wires.
4) Hold the RJ-45 plug with the clip facing down or away from you. Push the wires firmly into the plug. Inspect each wire is flat even at the front of the plug. Check the order of the wires. Double check again. Check that the jacket is fitted right against the stop of the plug. Carefully hold the wire and firmly crimp the RJ-45 with the crimper.
5) Check the color orientation, check that the crimped connection is not about to come apart, and check to see if the wires are flat against the front of the plug. If even one of these are incorrect, you will have to start over. Test the Ethernet cable.
Ethernet Cable Tips:
A straight-thru cable has identical ends.
- A crossover cable has different ends.
- A straight-thru is used as a patch cord in Ethernet connections.
- A crossover is used to connect two Ethernet devices without a hub or for connecting two hubs.
- A crossover has one end with the Orange set of wires switched with the Green set.
- Odd numbered pins are always striped, even numbered pins are always solid colored.
- Looking at the RJ-45 with the clip facing away from you, Brown is always on the right, and pin 1 is on the left.
- No more than 1/2" of the Ethernet cable should be untwisted otherwise it will be susceptible to crosstalk.
- Do not deform, do not bend, do not stretch, do not staple, do not run parallel with power cables, and do not run Ethernet cables near noise inducing components.
Basic Theory:
By looking at a T-568A UTP Ethernet straight-thru cable and an Ethernet crossover cable with a T-568B end, we see that the TX (transmitter) pins are connected to the corresponding RX (receiver) pins, plus to plus and minus to minus. You can also see that both the blue and brown wire pairs on pins 4, 5, 7, and 8 are not used in either standard. What you may not realize is that, these same pins 4, 5, 7, and 8 are not used or required in 100BASE-TX as well. So why bother using these wires, well for one thing its simply easier to make a connection with all the wires grouped together. Otherwise you'll be spending time trying to fit those tiny little wires into each of the corresponding holes in the RJ-45 connector.

The TIA/EIA 568-A standard which was ratified in 1995, was replaced by the TIA/EIA 568-B standard in 2002 and has been updated since. Both standards define the T-568A and T-568B pin-outs for using Unshielded Twisted Pair cable and RJ-45 connectors for Ethernet connectivity. The standards and pin-out specification appear to be related and interchangeable, but are not the same and should not be used interchangeably.

Both the T-568A and the T-568B standard Straight-Through cables are used most often as patch cords for your Ethernet connections. If you require a cable to connect two Ethernet devices directly together without a hub or when you connect two hubs together, you will need to use a Crossover cable instead.

A good way of remembering how to wire a Crossover Ethernet cable is to wire one end using the T-568A standard and the other end using the T-568B standard. Another way of remembering the color coding is to simply switch the Green set of wires in place with the Orange set of wires. Specifically, switch the solid Green (G) with the solid Orange, and switch the green/white with the orange/white.
Ethernet Cable Instructions:
1) Pull the cable off the reel to the desired length and cut. If you are pulling cables through holes, its easier to attach the RJ-45 plugs after the cable is pulled. The total length of wire segments between a PC and a hub or between two PC's cannot exceed 100 Meters (328 feet) for 100BASE-TX and 300 Meters for 10BASE-T.
2) Start on one end and strip the cable jacket off (about 1") using a stripper or a knife. Be extra careful not to nick the wires, otherwise you will need to start over.
3) Spread, untwist the pairs, and arrange the wires in the order of the desired cable end. Flatten the end between your thumb and forefinger. Trim the ends of the wires so they are even with one another, leaving only 1/2" in wire length. If it is longer than 1/2" it will be out-of-spec and susceptible to crosstalk. Flatten and insure there are no spaces between wires.
4) Hold the RJ-45 plug with the clip facing down or away from you. Push the wires firmly into the plug. Inspect each wire is flat even at the front of the plug. Check the order of the wires. Double check again. Check that the jacket is fitted right against the stop of the plug. Carefully hold the wire and firmly crimp the RJ-45 with the crimper.
5) Check the color orientation, check that the crimped connection is not about to come apart, and check to see if the wires are flat against the front of the plug. If even one of these are incorrect, you will have to start over. Test the Ethernet cable.
Ethernet Cable Tips:
A straight-thru cable has identical ends.
- A crossover cable has different ends.
- A straight-thru is used as a patch cord in Ethernet connections.
- A crossover is used to connect two Ethernet devices without a hub or for connecting two hubs.
- A crossover has one end with the Orange set of wires switched with the Green set.
- Odd numbered pins are always striped, even numbered pins are always solid colored.
- Looking at the RJ-45 with the clip facing away from you, Brown is always on the right, and pin 1 is on the left.
- No more than 1/2" of the Ethernet cable should be untwisted otherwise it will be susceptible to crosstalk.
- Do not deform, do not bend, do not stretch, do not staple, do not run parallel with power cables, and do not run Ethernet cables near noise inducing components.
Basic Theory:

By looking at a T-568A UTP Ethernet straight-thru cable and an Ethernet crossover cable with a T-568B end, we see that the TX (transmitter) pins are connected to the corresponding RX (receiver) pins, plus to plus and minus to minus. You can also see that both the blue and brown wire pairs on pins 4, 5, 7, and 8 are not used in either standard. What you may not realize is that, these same pins 4, 5, 7, and 8 are not used or required in 100BASE-TX as well. So why bother using these wires, well for one thing its simply easier to make a connection with all the wires grouped together. Otherwise you'll be spending time trying to fit those tiny little wires into each of the corresponding holes in the RJ-45 connector.
How to recover or restore a missing Recycle Bin icon in Windows Vista?
Doing some spring cleaning on your computer and accidentally delete the Recycle Bin icon in Windows Vista?
If your Recycle Bin icon is missing in Windows Vista, there’s a simple way you can get it back without having to edit the registry, etc.
1) Right-click on the Desktop and select Personalize. In the dialog box on the right hand side, there should be an option called Change desktop icons.
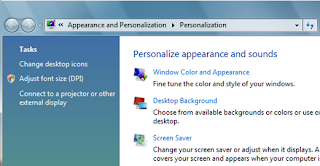
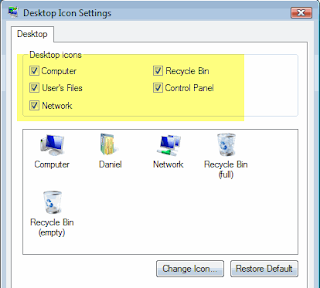
2) On the Change desktop icons dialog box, check the Recycle Bin box to add that back to your desktop. You’ll notice that there is a Full Recycle Bin and Empty Recycle Bin icon.
3} If you click Apply, your icon should now be back on the desktop.
However, there may be an issue for some people in which the Recycle Bin continually shows full or empty and does not change depending on if something is added or removed from the trash. It’s almost like Windows Vista gets confused and simply uses one icon instead of switching back and forth.
If you have this problem where the recycle bin icon does not change to reflect “full” and “empty” then you need to first check off Recycle Bin icon like shown above. Then go ahead and left click on the Recycle Bin full icon and click Change Icon. Select the highlighted icon which should be the full Recycle Bin icon. Do the same thing with the empty Recycle Bin icon and go ahead and click Apply.
The Recycle Bin icon should now be on your desktop and should automatically update based on whether there is data in the trash or not.
If your Recycle Bin icon is missing in Windows Vista, there’s a simple way you can get it back without having to edit the registry, etc.
1) Right-click on the Desktop and select Personalize. In the dialog box on the right hand side, there should be an option called Change desktop icons.
2) On the Change desktop icons dialog box, check the Recycle Bin box to add that back to your desktop. You’ll notice that there is a Full Recycle Bin and Empty Recycle Bin icon.

3} If you click Apply, your icon should now be back on the desktop.
However, there may be an issue for some people in which the Recycle Bin continually shows full or empty and does not change depending on if something is added or removed from the trash. It’s almost like Windows Vista gets confused and simply uses one icon instead of switching back and forth.
If you have this problem where the recycle bin icon does not change to reflect “full” and “empty” then you need to first check off Recycle Bin icon like shown above. Then go ahead and left click on the Recycle Bin full icon and click Change Icon. Select the highlighted icon which should be the full Recycle Bin icon. Do the same thing with the empty Recycle Bin icon and go ahead and click Apply.
The Recycle Bin icon should now be on your desktop and should automatically update based on whether there is data in the trash or not.
How do I download and install the full driver and software package for my Brother machine using a wired network connection?
PART 1: DOWNLOAD THE FULL DRIVER AND SOFTWARE PACKAGE:
1. Make a temporary directory on your HDD to save the downloaded self-extracting file. To make a temporary directory on your HDD, follow the steps below:
WINDOWS 2000/XP
a. Click on START -> (MY) COMPUTER or Double click on MY COMPUTER on your desktop.
b. Double click on your local disk drive (e.g. Local Disk (x:), where 'x' is the letter of your local hard drive)
c. Click on FILE -> NEW -> FOLDER or Right click on a blank area of the window then choose NEW -> FOLDER.
d. Type BrotherXXXX to rename the folder and press ENTER. (Where XXXX is the model of your Brother machine).
WINDOWS VISTA
a. Click on WINDOWS/START -> COMPUTER
b. Double click on your local disk drive (e.g. Local Disk (x:), where 'x' is the letter of your local hard drive)
c. Click on ORGANIZE -> NEW FOLDER.
d. Type: BrotherXXXX to rename the folder. (Where XXXX is the model of your Brother machine).
2. Open your Internet browser and type http://www.brother-usa.com/downloads on the address bar.
3. Choose your Product Group, Model, and click VIEW DOWNLOAD.
4. Click on the link under YOUR RESULTS.
5. Under STEP 1: SELECT TYPE select DRIVERS.
6. Under STEP 2: SELECT OS, select your operating system.
7. Under STEP 3: SELECT LANGUAGE select ENGLISH.
8. A SEARCH button will appear after you select your language. Click on the SEARCH button.
9. Locate FULL DRIVER AND SOFTWARE PACKAGE and click on MORE INFORMATION...
10. Make note of the instructions on this page that state the directorypath of the files once they have been extracted. This will assist you with locating the correct file after you have extracted the download.
11. On the next page click on the DOWNLOAD button under FULL DRIVER ANDSOFTWARE PACKAGE.
12. On the End-User License Agreement for Brother Software page click onI ACCEPT.
13. Click SAVE.
14. You will be prompted again to save the file:
- WINDOWS 2000/XP: In the Save In dropdown, choose the folder you created earlier BrotherXXXX, then click SAVE. The drivers will download.
- WINDOWS VISTA: Double click COMPUTER -> LOCAL DISK (X:) -> BROTHERXXXXand click SAVE. The drivers will download.
PART 2: INSTALL THE FULL DRIVER AND SOFTWARE PACKAGE:
NOTE: If you are using any personal firewall software such as BlackIce, McAfee, or Norton we recommend you temporarily disable it during the installation - if you are not sure how to disable these programs refer to your program documentation or contact the manufacturer.
Once the installation is complete and you are sure that you can print, re-enable your personal firewall software. It is also recommended that you close any other open applications.
1. Connect the network cable to the Brother machine and then connect it to a free port on your hub.
2. Plug in the power cord and then power ON the Brother machine.
3. On the computer click START -> (MY) COMPUTER or Double click on (MY)COMPUTER on your desktop.
4. Double click on your local disk drive (e.g. Local Disk (x:), where 'x' is the letter of your local hard drive)
5. Locate the folder you created earlier labeled BrotherXXXX and doubleclick on it.
6. Locate the file you downloaded and double click on it.
7. If you are prompted with a security warning click RUN or CONTINUE.
8. It will launch a ZIP SELF DECOMPRESSION window, click on DECOMPRESS(X).
9. You will get a message "The decompression process was successful." Click OK. Make note of the folder that was created.
10. Within the extracted folder, locate the setup file. Use the information you collected from the download page to locate where the file is saved.
11. Double click on SETUP.EXE. (.EXE may not be visable). The installation will begin.
12. When the Brother MFL-Pro Suite Software License Agreement window appears, click YES if you agree to the Software License Agreement.
13. Choose NETWORK, and then click NEXT. The installation continues.
14a). If the Brother machine is the only network-printing device
found on the network the installation of the Brother drivers will automatically start. The installation screens appear one after another. Please wait. It will take a few seconds for all the screens to appear. DO NOT try to cancel any of the screens during this installation. Continue to Step 16 if this action takes place.
b) If there is more than one network-printing device found you will be asked to select your model machine from the list and then click NEXT.
c) If the Brother machine is not yet configured for use on your network or you receive a message stating: No Device Found on the Network, the CONFIGURE IP ADDRESS window will appear. Enter the IP address information appropriate to your network by following the on-screen instructions.
If you are not certain what information to enter you should contact your network administrator.
15. When the On-Line Registration screen is displayed, click NEXT
16. Choose YES, I WANT TO RESTART MY COMPUTER and click FINISH to restart your computer. After restarting the computer, the Installation will be complete.
Subscribe to:
Posts (Atom)