The nv4_disp problem
When a Dell Dimension greets you with a Blue Screen of Death (BSOD) your computer will not boot up.
After booting into Safe Mode first and then rebooting the computer, I was able to get an error on boot that gave me some idea of the problem. The error message said that the “nv4_disp” driver was apparently caught in an infinite loop.
The nv4_disp fix
Here are 5 easy steps to fix the problem.
1) Boot your computer into Safe Mode w/ Networking. For Windows XP users, this is accomplished by pressing F8 repeatedly when your computer is booting up. You will be presented with several options. Choose “Safe Mode w/ Networking.” This will boot Windows XP into Safe Mode, but you will be able to connect to the Internet and browse the Web.
2) Go to NVIDIA’s Web site and download the latest display drivers for Windows XP. Save the 20MB file to your desktop for easy locating later on.
3) Remove the NVIDIA display drivers currently installed on your machine. To do this, right click on “My Computer,” then select Properties. Click the “Hardware” tab, then click “Device Manager.” You now see a list of hardware devices installed on your computer. Double click “Display Adapters.” You should now see your NVIDIA card listed. Click it once to highlight it, then click the “Uninstall” icon in the upper right of Device Manager menu. The NVIDIA drivers are removed from your machine.
4) Install the updated NVIDIA display drivers. Double-click the NVIDIA setup file you saved to the desktop earlier. The installation will run its course.
5) Reboot your computer.
Thursday, September 10, 2009
Sunday, September 6, 2009
RAID Configuration with ORCA on a HP PC
You decide to install a Microsoft OS (client or server) and create a RAID 1 on a HP PC client or server. You can use ORCA, a simple ROM-based configuration utility that runs on all operating systems.
When using an HP Smart Array controller as your boot controller, use the Option Rom Configuration for Arrays (ORCA) utility to configure your logical boot drive. The ORCA utility can only be accessed when the system is booting.
To create a logical drive using ORCA, follow these steps:
1. Press the F8 key when the prompt appears on the screen during boot to start ORCA and configure your logical boot drive.
2. Select Create Logical Drive. The screen displays a list of all available (unconfigured) physical drives and the valid RAID options for the system.
3. Use the Arrow keys, Spacebar, and Tab to navigate around the screen and set up the logical drive, including an online spare drive if one is required.
NOTE: You cannot use ORCA to configure one spare drive to be shared among several arrays.
4. Press Enter to accept the settings.
5. Press F8 to confirm the settings and save the new configuration. After several seconds, the Configuration Saved screen appears.
6. Press Enter to continue. You can now create another logical drive by repeating the previous steps.
NOTE: Newly created logical drives are invisible to the operating system. To make the new logical drives available for data
storage, format them using the instructions given in the operating system documentation.
ORCA Limitations
For the most efficient use of drive space, do not mix drives of different capacities within the same array. The configuration utility treats all physical drives in an array as if they have the same capacity as the smallest drive in the array. The excess capacity of any larger drives is wasted because it is unavailable for data storage.
The probability that an array will experience a drive failure increases with the number of physical drives in the array. If you configure a logical drive with RAID 5, keep the probability of failure low by using no more than 14 physical drives in the array.
Saturday, September 5, 2009
How do I remove boot choices when I start up Microsoft Windows XP?
I have 2 partitions on my computer. Every time I boot my PC, I have to choose between starting with my original Windows XP Pro or Windows XP Pro Setup. And if I choose for the setup, my computer crashes.
To get rid of your boot choice, apply the following steps.
1) There is a hidden file in the root of your boot drive, called "boot.ini". It controls what happens at boot time.
Right click on My Computer, and select Properties.
2) Now click on the Advanced tab. In a section labeled Startup and Recovery click on the button labeled Settings. You should see the dialog box pictured below:
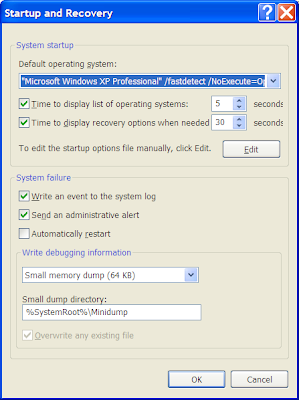
3) Click on Edit to edit the startup options file (aka boot.ini) manually. That should open Notepad with something similar to the following from my machine:
[Boot Loader]
Timeout=5
Default=C:\$WIN_NT$.~BT\BOOTSECT.DAT
[Operating Systems]
multi(0)disk(0)rdisk(0)partition(3)\WINDOWS="Microsoft Windows XP Home Edition" /noexecute=optin /fastdetect
C:\$WIN_NT$.~BT\BOOTSECT.DAT="Microsoft Windows XP Professional Setup"
4) In this example, you can see that I have two options to choose from when I boot: Windows XP Home Edition and Windows XP professional Setup. You can simply delete the second line and save the file.
5) When you next reboot you should no longer have that additional option. But if there is still a second boot showing as "Windows (Default)", then change the line "Default=C:\$WIN_NT$.~BT\BOOTSECT.DAT" with "default=multi(0)disk(0)rdisk(0)partition(3)\WINDOWS" and save the file once again. The file should look as shown below:
[boot loader]
timeout=30
default=multi(0)disk(0)rdisk(0)partition(3)\WINDOWS
[operating systems]
multi(0)disk(0)rdisk(0)partition(3)\WINDOWS="Microsoft Windows XP Home Edition" /noexecute=optin /fastdetect
Subscribe to:
Posts (Atom)